
How to display variant metafield value dynamically on product pages?
Displaying variant metafields on product pages can provide valuable information specific to each product variation. While variant metafields cannot be easily accessed through the “Insert dynamic source” feature, it is indeed possible to render variant metafield values dynamically on product pages using a combination of Liquid and JavaScript. Without JavaScript, the variant metafield values would not update dynamically when switching variants, but only upon refreshing the entire product page.
In this guide, we will delve into the process of dynamically displaying variant metafields using the Dawn theme (version 9.0). Our objective is to showcase additional information related to a specific product variant, specifically the production time of that variant.
What you will need to set up
To successfully render variant metafield values on the product pages, follow these steps to set up the necessary components:
- Create a variant metafield and populate it with data.
- Add a new block to the product page (main-product.liquid).
- Render the block on the product page (main-product.liquid).
- Add JavaScript code snippets in the main-product.liquid and global.js files
Note: I recommend using Shopify CLI and Shopify GitHub integration when working with the theme’s codebase. The online editor is great for quick & small changes in one file but if you are about to make more significant changes (as in our case), I highly recommend the integration and Shopify CLI for themes.
If you are not familiar with Shopify CLI or the GitHub integration, we recommend making a backup copy of your theme before proceeding with the setup of the variant metafield. This step will help ensure that you have a backup in case any unexpected issues arise during the process.
Create a variant metafield and populate it with data
To create a variant metafield and populate it with data, follow these steps:
- Start by creating a variant metafield. If you’re unfamiliar with this process, you can refer to our previous article on metafields: How to display additional product information on your store? Use integrated Shopify metafields. (Themes 2.0. and vintage themes). This resource will guide you through the process of creating metafields, including integrated Shopify metafields for Themes 2.0 and vintage themes.
- In our example, we’ll use the single-line metafield type. However, feel free to choose a different metafield type based on your requirements. Shopify provides various options such as multi-line text, rich text, integers, images, and more.
- Once you’ve created the variant metafields, navigate to your product section in the admin panel.
- Locate the specific products to which you want to assign variant metafield values.
- For each variant, find the corresponding variant metafield and enter the relevant data.
- Save the product to ensure the variant metafield values are stored correctly.
Add a new block to the product page
To show the variant metafield value on the product pages, we will create a block. Our solution is very simple and does not allow any customizations from the Shopify admin. However, if you wish you can add any additional settings to this block.
Add the following piece of code in the {%schema%}.
Render the block on product pages
To render the variant metafield block on the product pages using the whenstatement, follow these steps:
- In the main-product.liquid file, paste the following piece of code to render the variant metafield block.
- Then, navigate to Customize → select Product page template.
- Add a new block to the product page by selecting the “Variant metafield” block from the available options.
- Save your selection.
Define a dictionary in the main-product.liquid file
Then, we will create an empty dictionary that will store key-value pairs. In this case, the keys will correspond to the product variant IDs, and the values will represent the variant metafield values. Insert the following code snippet in the main-product.liquid file before the opening {% schema %} tag:
Add a JS code snippet in the global.js file
In our example, we will utilize the existing JavaScript function called toggleAddButton, which is called whenever a store visitor selects another product variant on the product page. To incorporate the variant metafield functionality, insert the following code snippet before the line if (!modifyClass) return; in the global.js file:
Let’s see the results
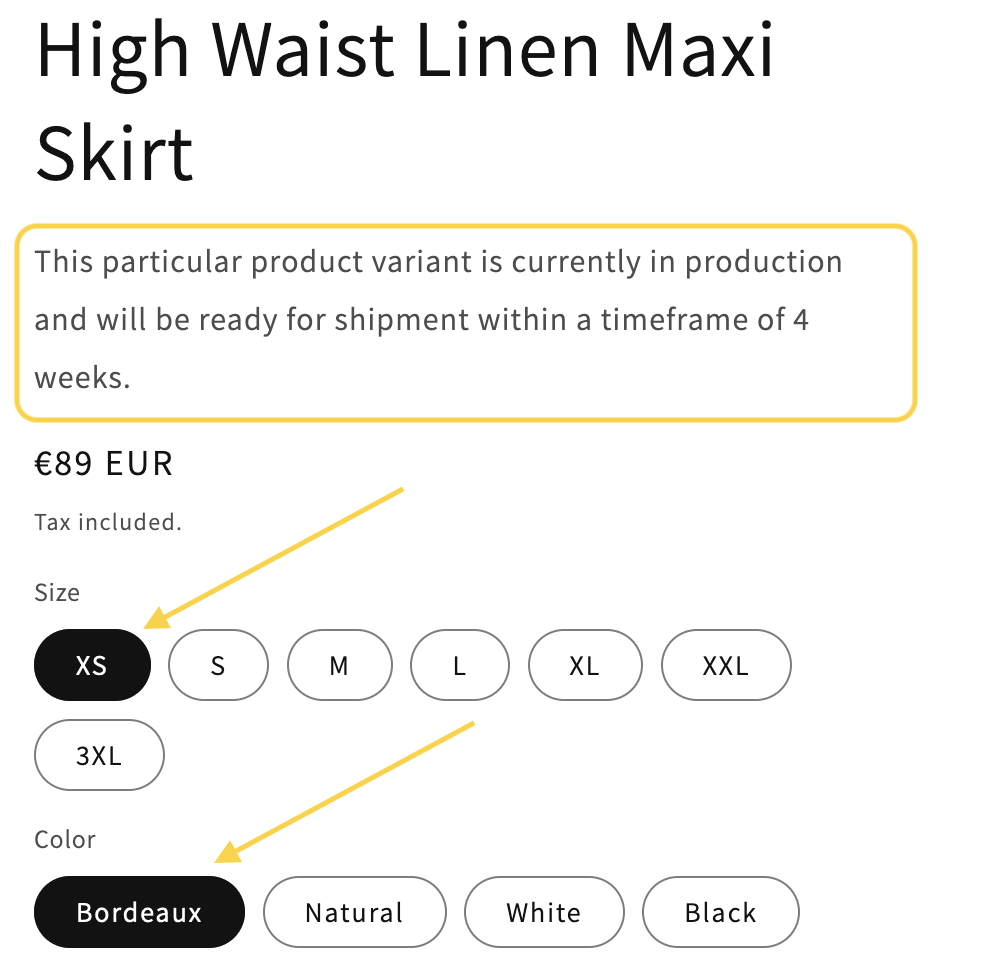
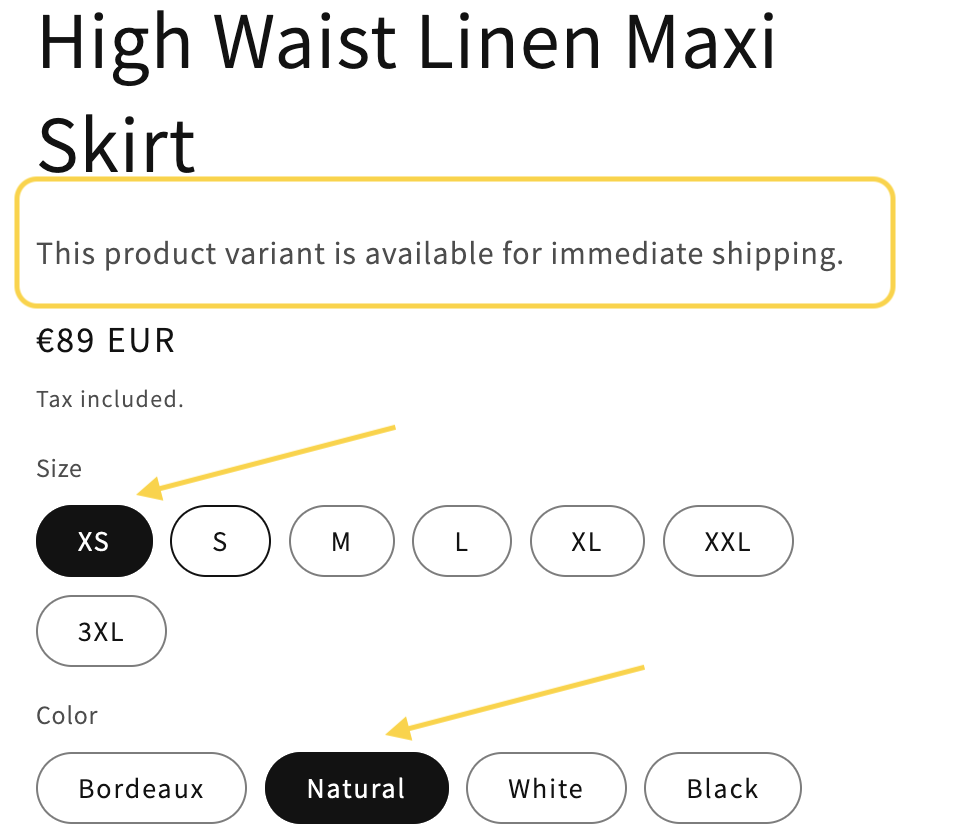
If you followed the guide and successfully set up the variant metafield, you should now see the variant metafield value displayed on the product pages. If it doesn’t appear immediately, try refreshing the page. Additionally, when you select a different product variant, the corresponding variant metafield value should be dynamically updated and displayed accordingly. Also, don’t forget to add CSS classes so that it fits well with your store’s layout and theme.
Take a look at the screenshots below for a visual representation of the expected results.
Limitations of this solution
Our solution provides a simple approach that works well for products with a limited number of variants and when using the single-line or short multi-line text variant metafield type.
However, if you opt for, e.g., a rich-text metafield type and have a substantial number of product variants that will be assigned the variant metafield, it’s important to consider potential store performance implications–the solution may slow down the store’s speed.
In such cases, using AJAX and employing an alternative approach would likely be more suitable.
We hope this guide has been helpful in assisting you with rendering variant metafield values on your product pages. If you encounter any issues or have further questions, please don’t hesitate to reach out to us. We’re here to provide assistance and support.
Looking for some more quick Dawn theme customizations?
We put together a guide on how to add a custom label (such as limited edition) to product pages, collection pages and featured collections. You might also be interested in an article on how to add a customer note on a product pages. You can also check an article on How to display the number of products left in stock on product pages?. Happy reading!