
Migrating Shopify store from Universal Analytics to Google Analytics 4
Google has announced earlier this year that they will be sunsetting Universal Analytics in the middle of 2023. It’s a big thing for all (ecommerce) business, which use the data collected by UA for their business and marketing decision making process. The most important thing is that the UA will stop processing new hits.
Therefore, Google calls for every business to migrate to new Google Analytics 4 as soon as possible – the earlier you migrate, the more historical data and insights you will have in Google Analytics 4.
Why is this happening?
Since universal analytics were built some time ago, they no longer meet the current requirements of businesses, privacy policies nor the way the data are collected. The measurement methodology has become obsolete, mainly relying on independent sessions and gathering data using cookies.
The newly created event-based measurement model of GA4 can, on the other hand, process data across multiple platforms, doesn’t exclusively rely on cookies, and takes into account user privacy needs.
Here are a couple of highlights of GA4:
- No more last-click attribution! Understand your marketing efforts and improve ROI with data-driven attribution
- Get a complete view of your customer journey across touchpoints thanks to event-based measurement (no more data fragmentation by platform nor organization into independet sessions)
- Privacy is important! Manage and minimise the collection of user-level data (cookies, metadata), while preserving the key measurement functionality.
- Use sophisticated predictive insights about user behaviour and conversions (based on machine learing)
- Integrate with other Google products, such as Google ads (use combined data for optimizing your campagigns and tuning your marketing efforts)
Deadlines
- All standard Universal Analytics properties will stop processing new hits on July 1, 2023.
- 360 Universal Analytics properties will stop processing new hits on October 1, 2023.
- You will have access to previously processed UA data for at least six months.
Note: Due to the reasons mentioned above, we recommend that all merchants make the switch to GA4 as soon as possible to build the necessary historical data before UA stops processing new hits.
How to migrate your Shopify store from UA to GA4?
Right now, Shopify supports tracking under UA properties and isn’t currently compatible with GA4. In other words, there’s no UI friendly (no-code) way how to configure GA4 on your Shopify store.
There is no exact date announced by Shopify (unofficialy, the configuration should be released in March 2023), when this will be all set up. Until then, you can either implement the tracking by yourselves (light coding skills will be needed) or wait till Shopify releases a simple no-code option. In the following part of this article, you’ll find out how to install GA4 on your Shopify store:
- using the Shopify integration (to be done when more information is available),
- manually,
- with GTM.
Create a new property and add a data stream
Before installing the GA4 piece of code to your site, you need to set up two important things – a new property and data streams.
Create a new property
- Open your GA account and go to Admin → GA4 Setup Assistant, then click the Get Started button.
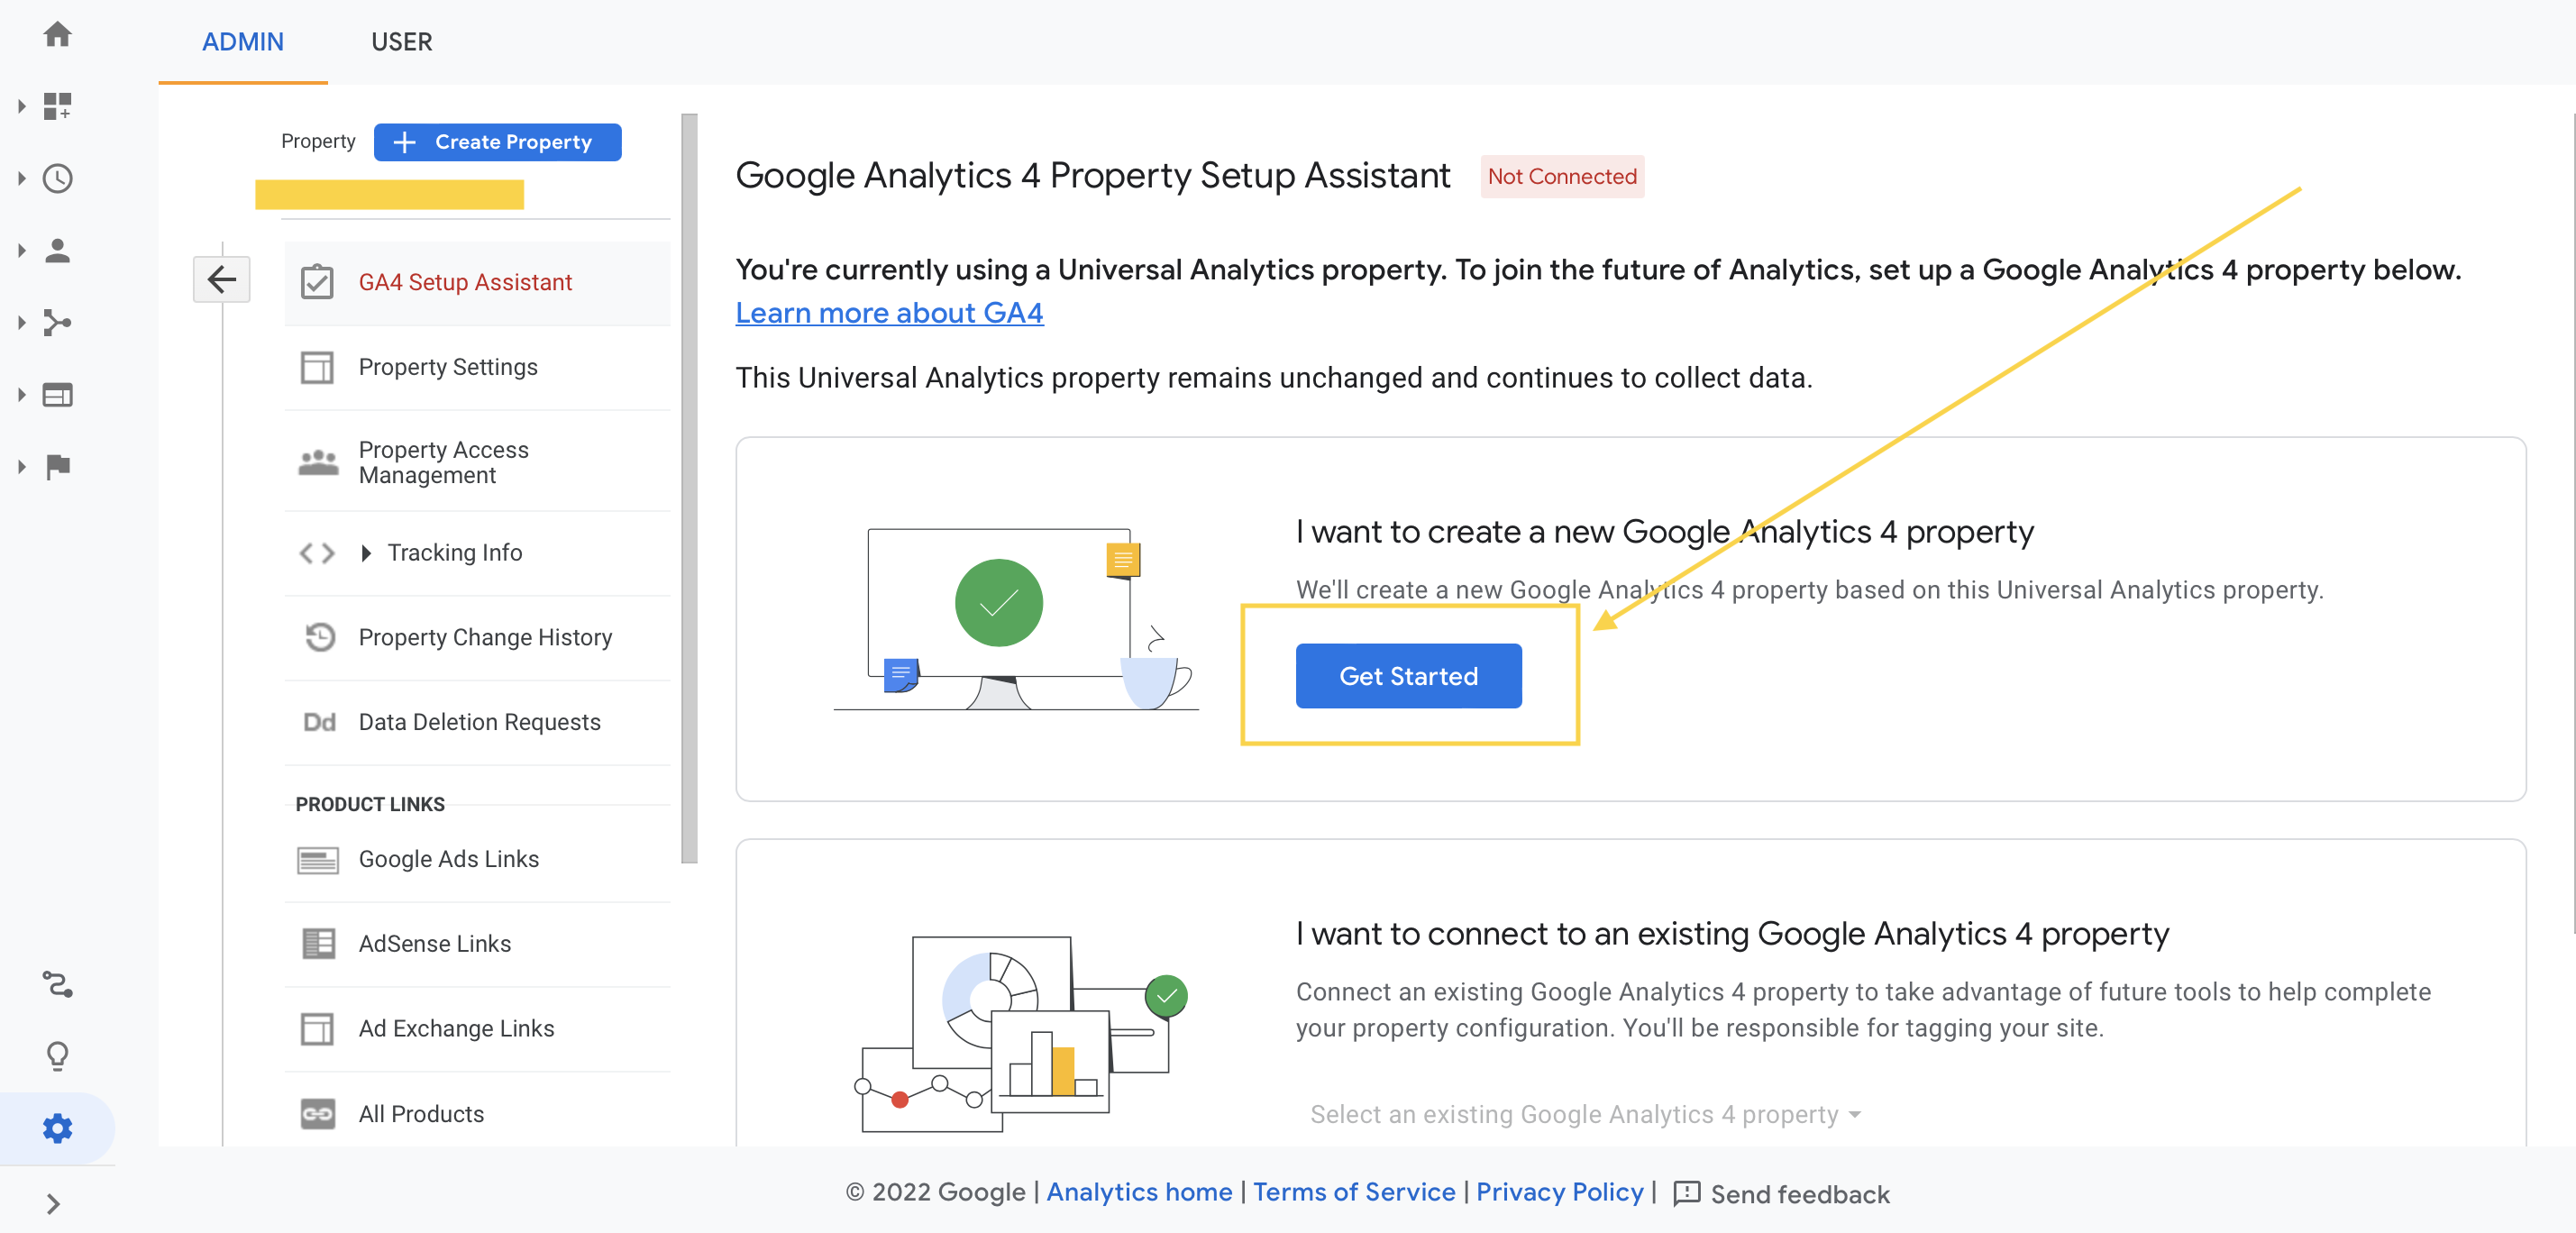
- After clicking the button, Google will give you a quick overview of the next steps (what will be set up and what will remain unchanged).
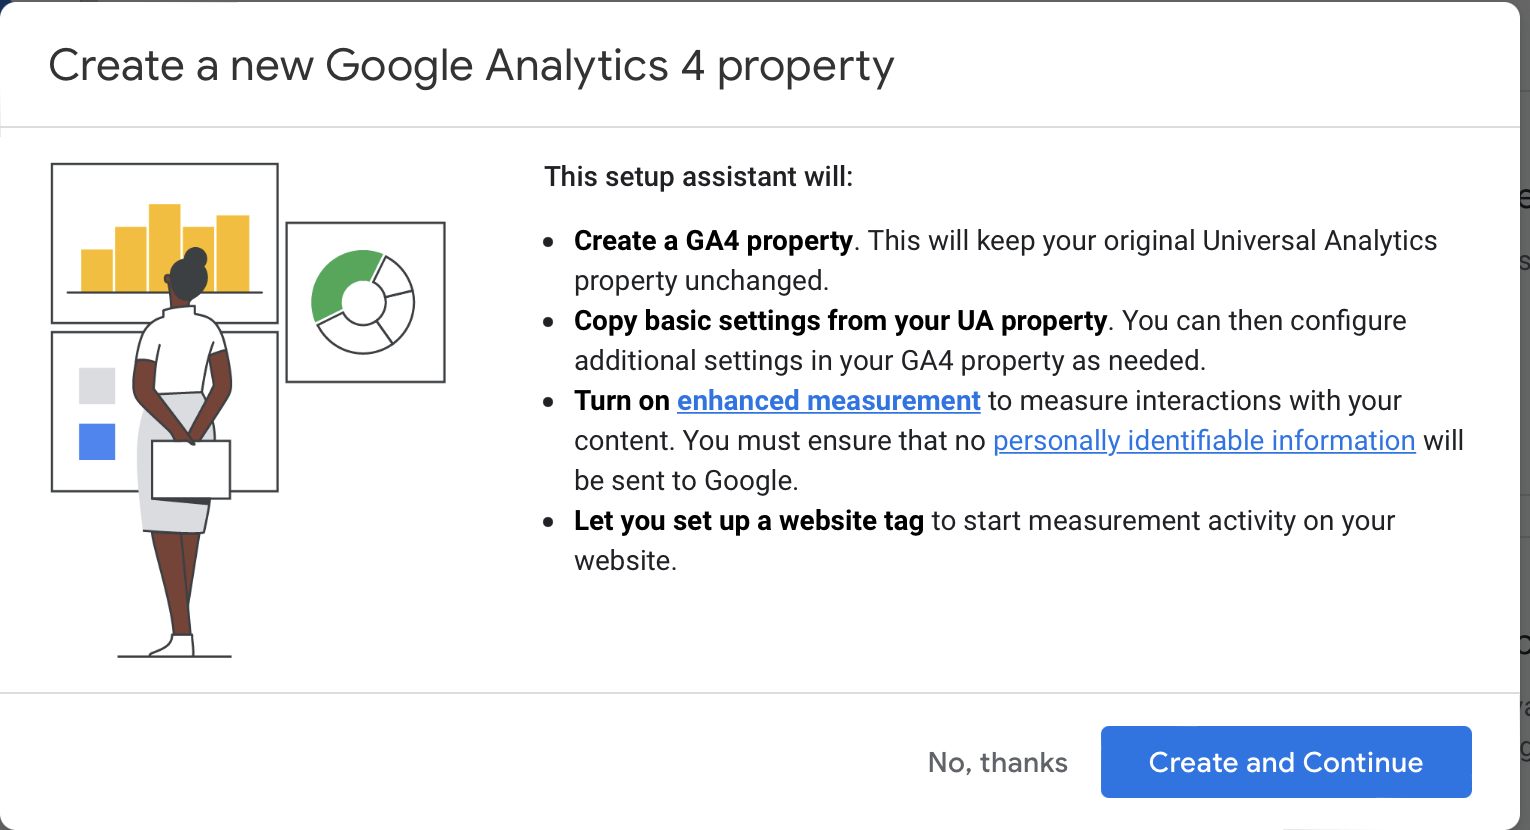
- Please, bear in mind that your existing UA property will be unaffected and that your new GA4 property will not be populated with any historical data!
- Create the property and continue with the setup.
- A new modal window will show up. You need to decide how you want to set up a Google Tag.
- In our guide, we will install a new Google Tag (if you wish, you can use a Google Tag you already have).
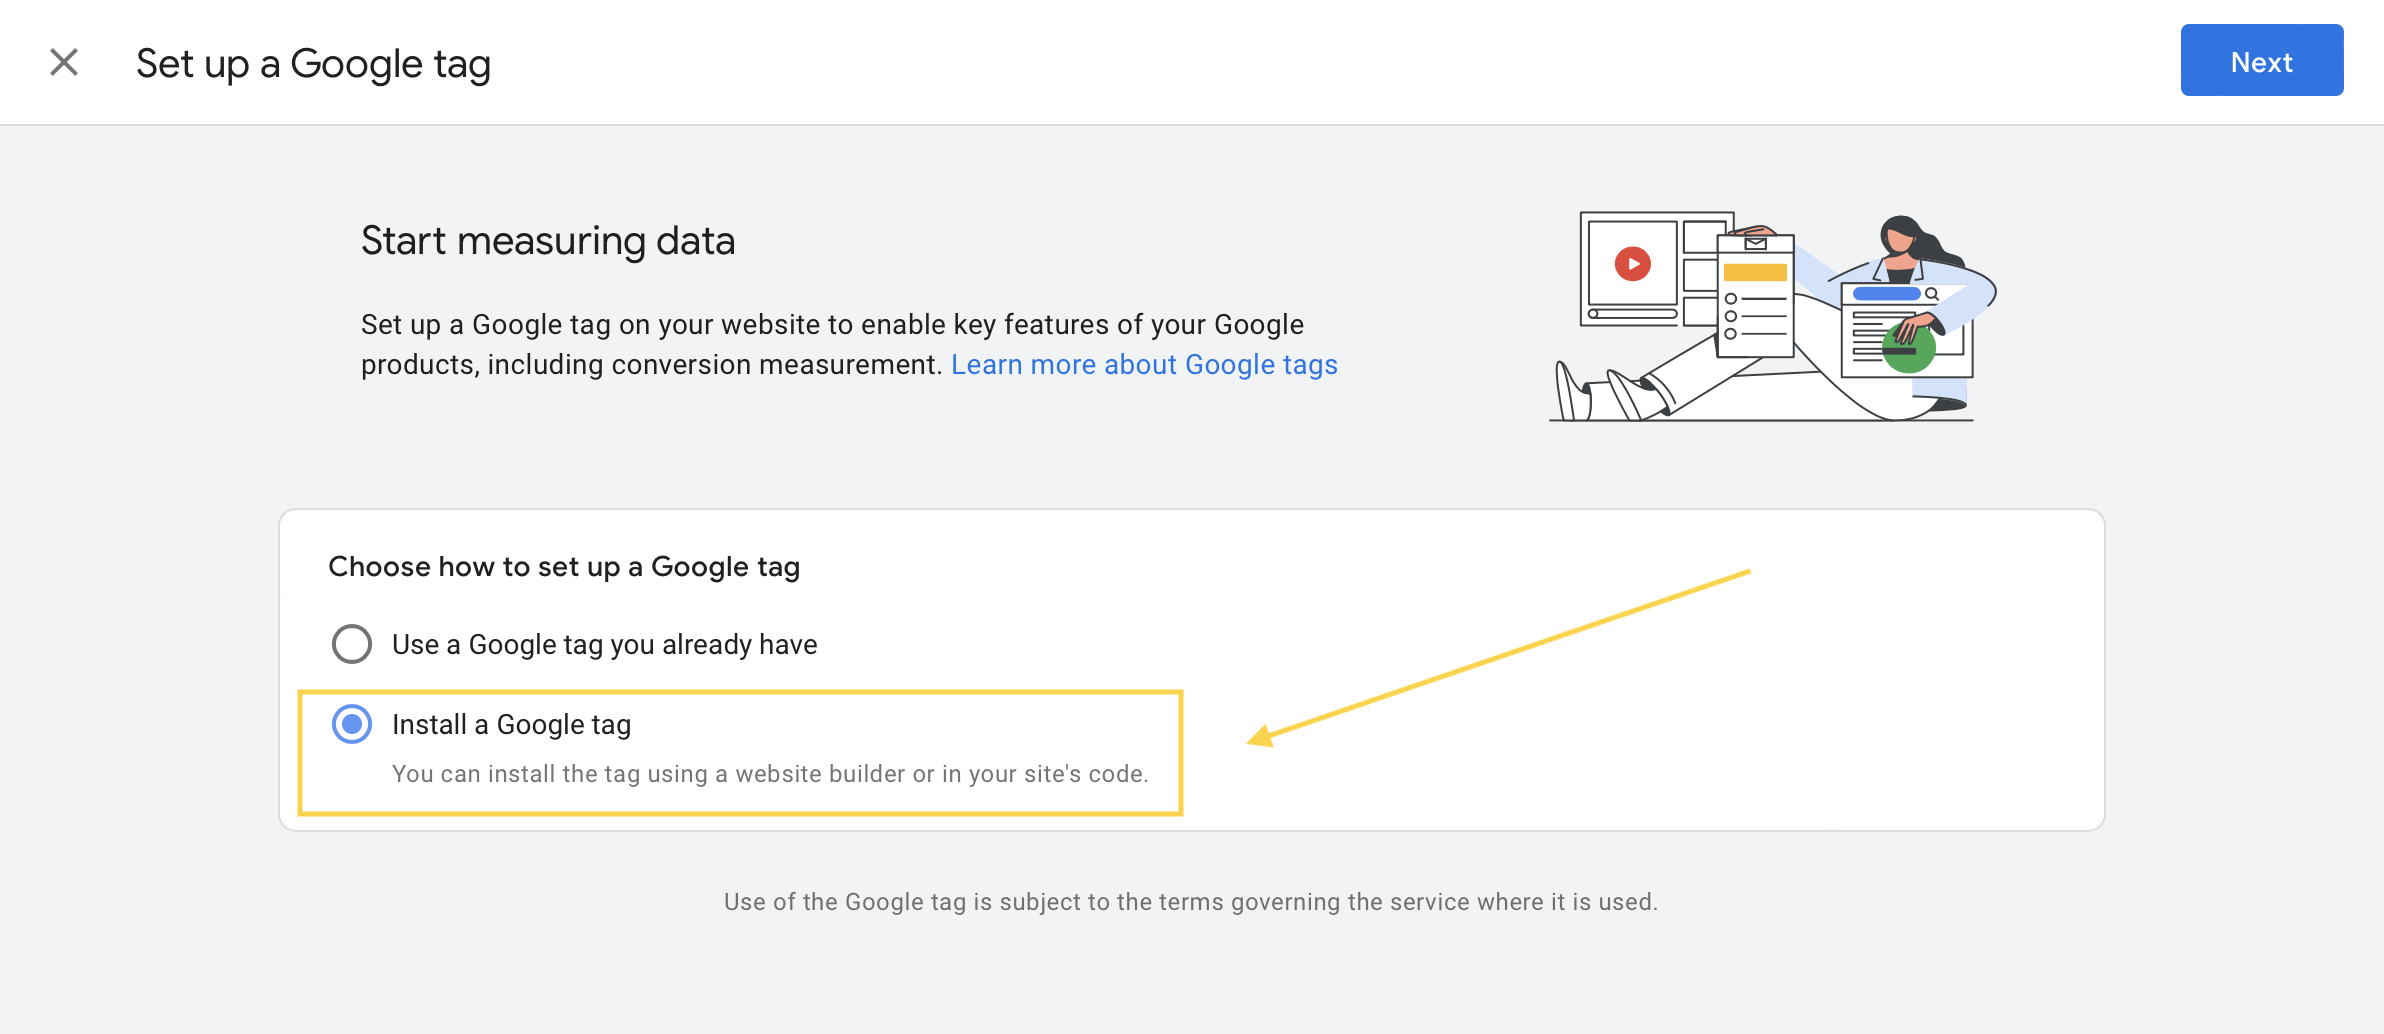
- The next screen shows two main ways how you can install the Google tag to your store. You can either use an integration (website builders, CMS) or install it manually. The first option doesn’t come into consideration since you can notice that there is no integration with Shopify yet. Therefore, we need to choose the second option – install the tag manually.
- When you click the tab “Install manually”, you can see the Google tag piece of code.
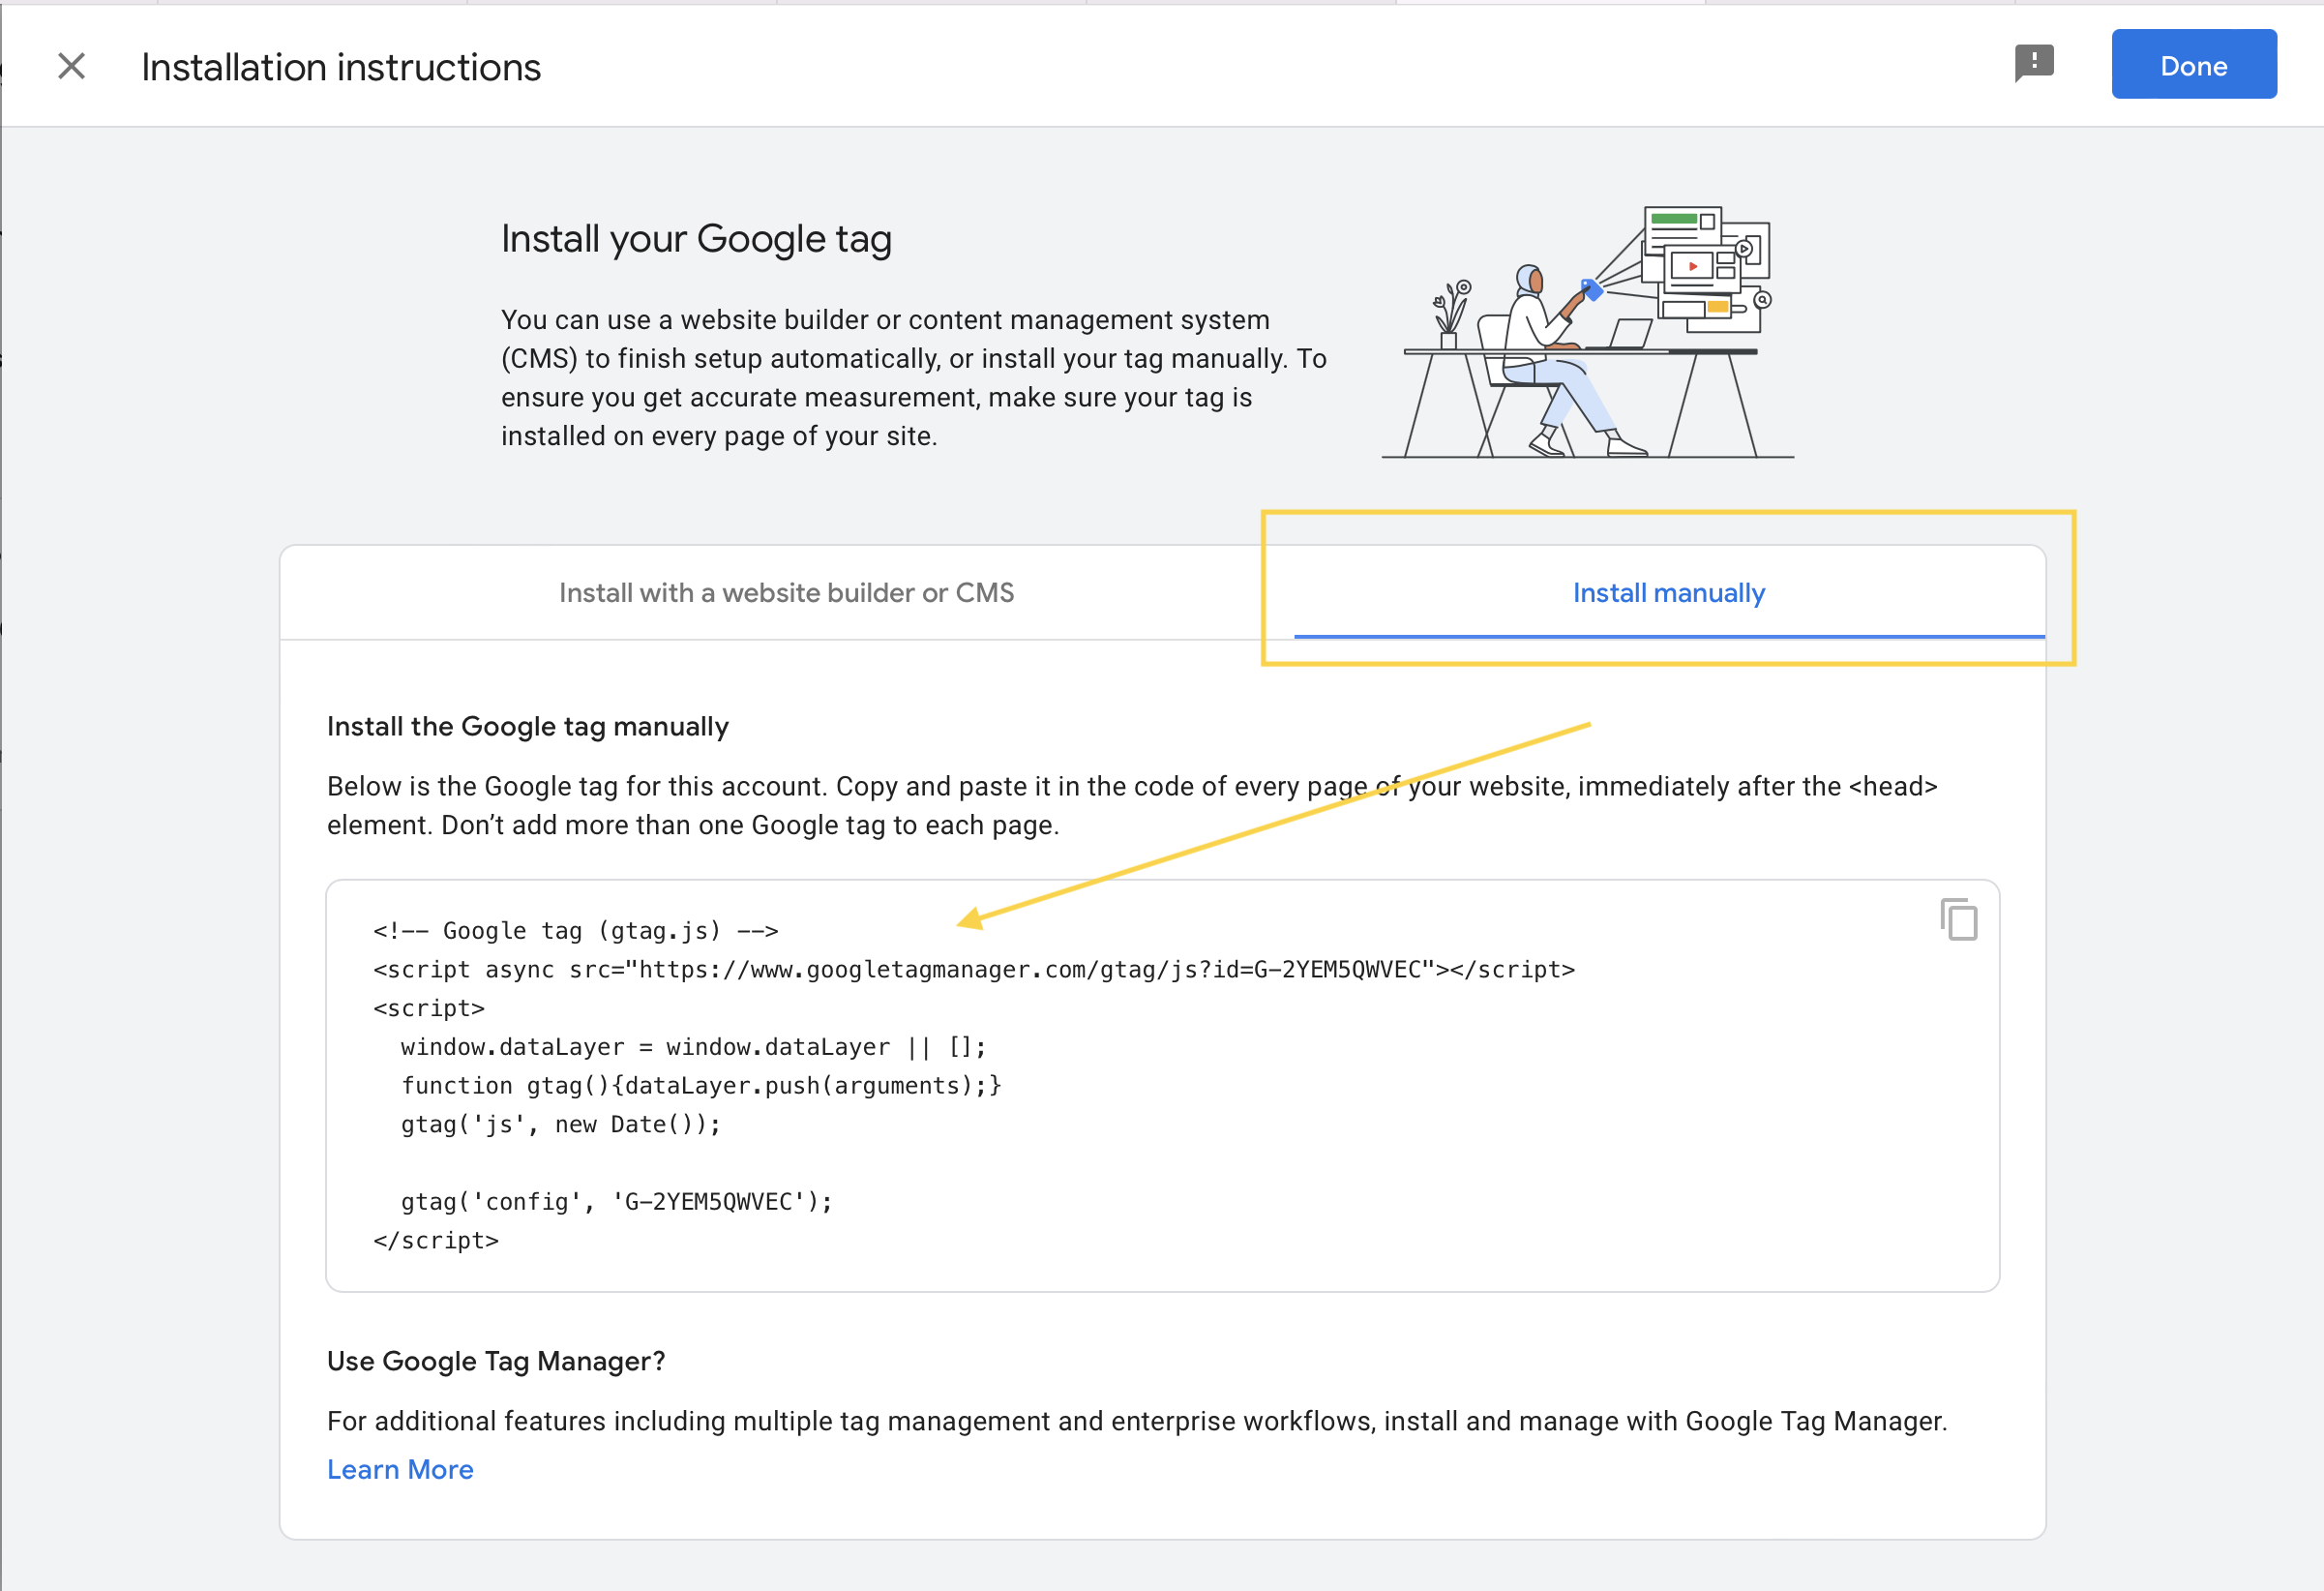 .
. - Click “Done” button. You will redirected to the newly created GA4 property. (You don’t need to save the piece of code, we will access it later when adding a new data stream).
- Now, a new property is all set up.
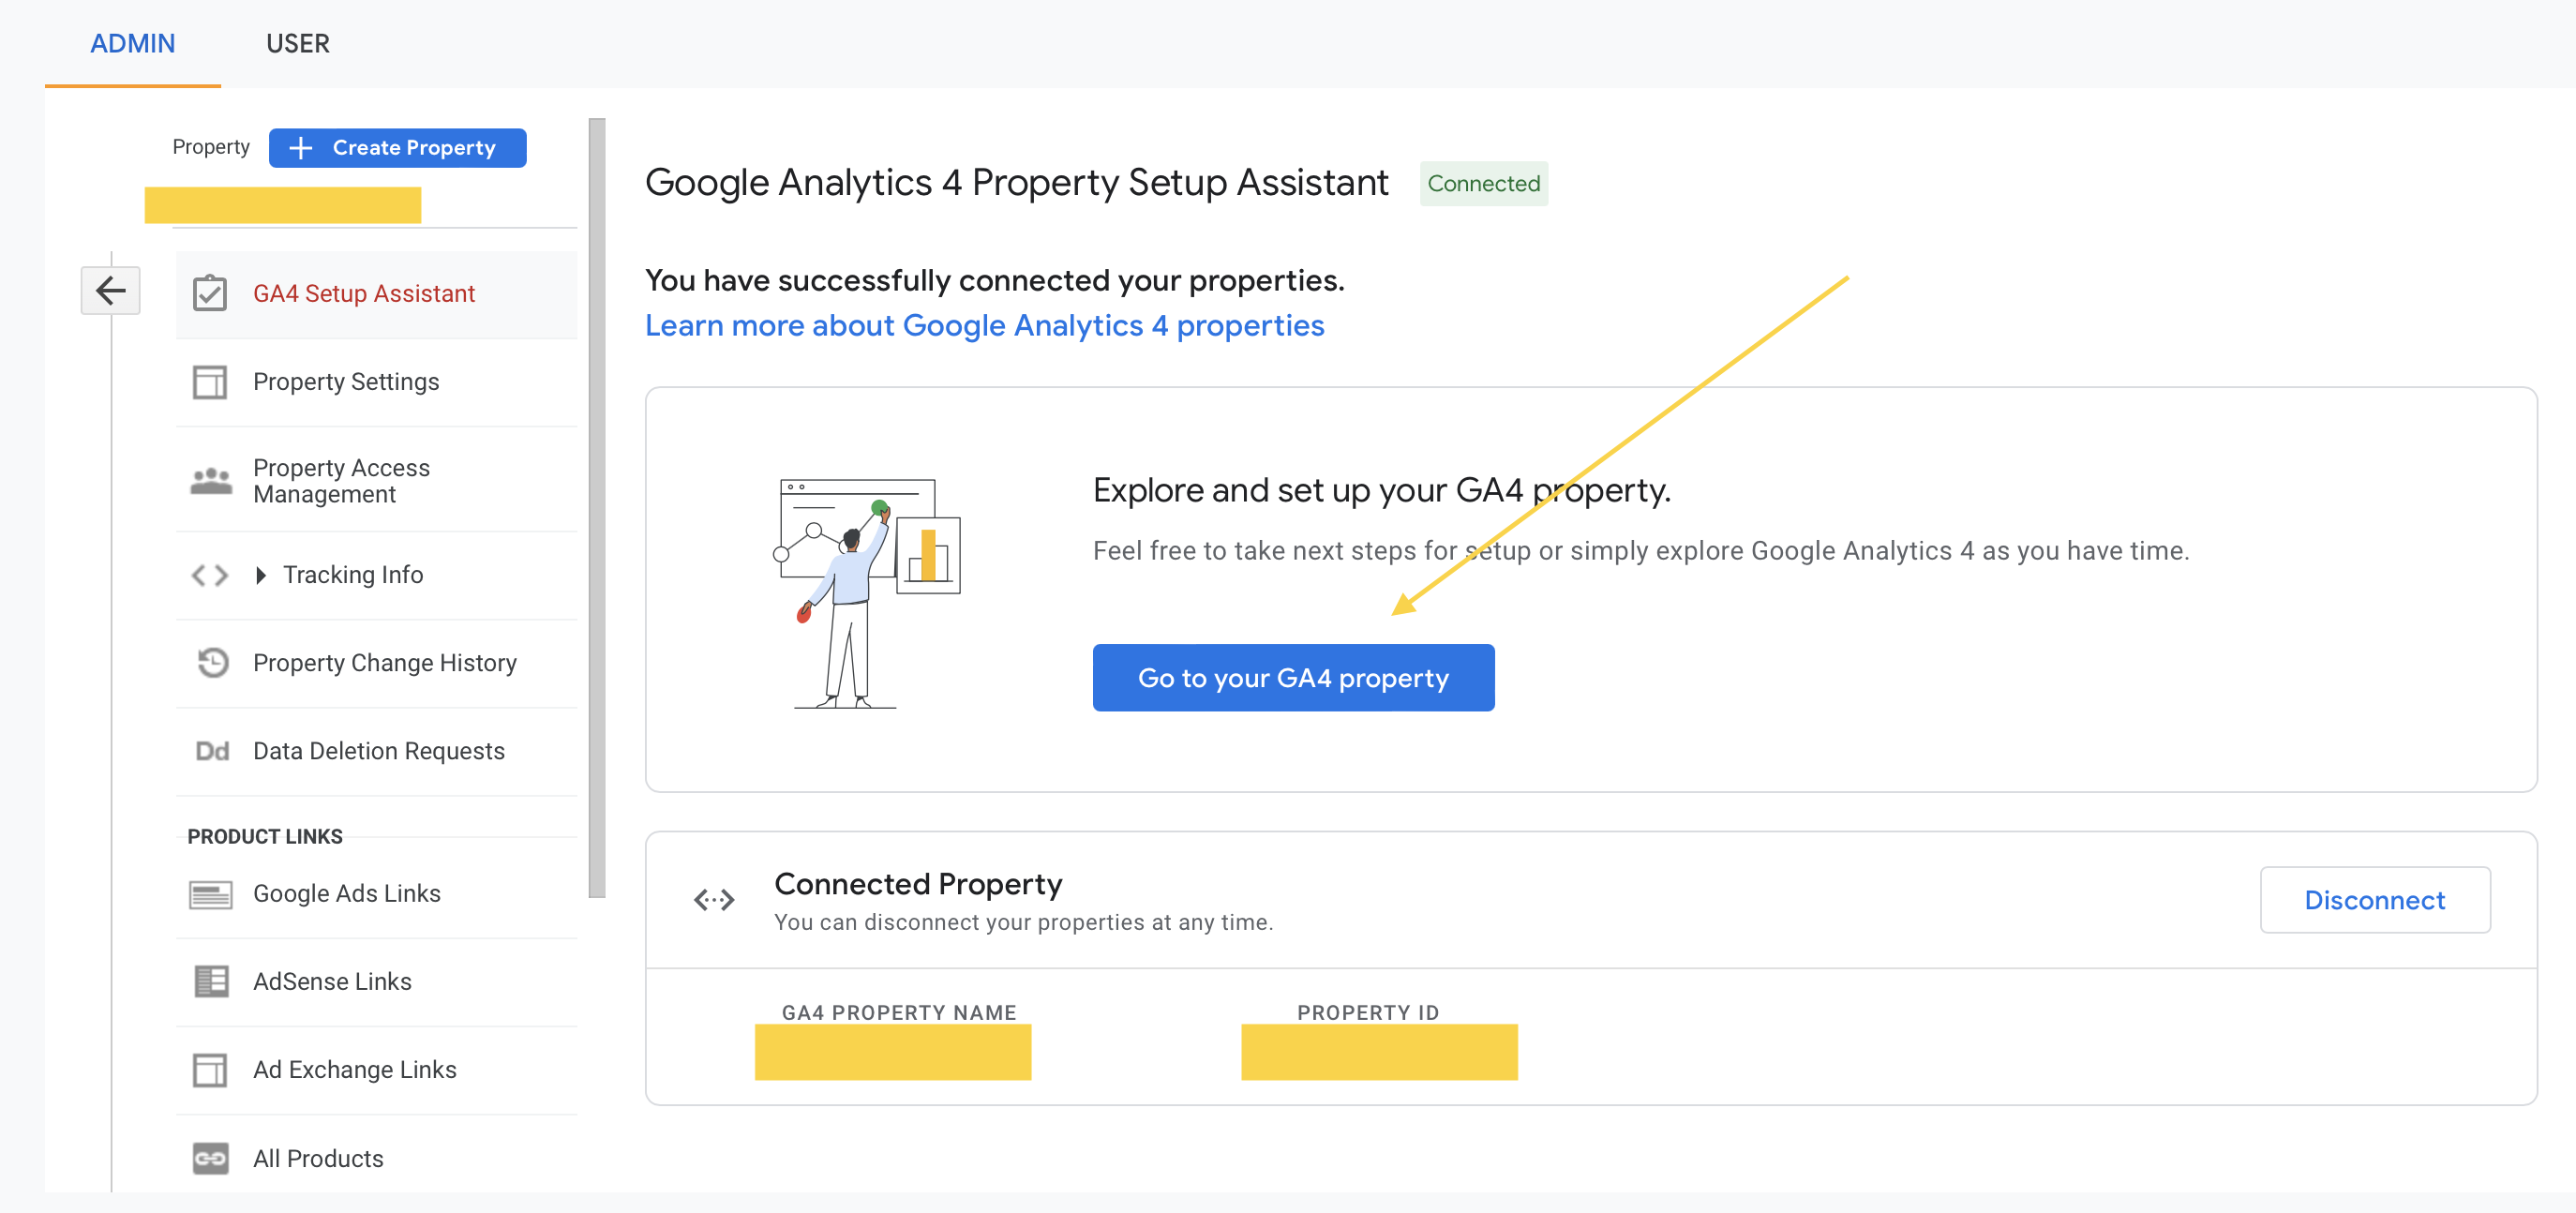 .
.
This was a first step on how to set up the GA4. Now, it’s time to add a data stream.
Add a data stream
To start collecting data, we have one more step to complete. You have probably noticed that we didn’t include the store URL when creating the new property (this step was essential when creating a Universal Analytics property).
The reason is that GA4 collect data across multiple touchpoint and therefore we will be using data streams instead. Each GA4 property can have up to fifty different data streams, which can come from either mobile apps or websites.
- To create a data stream, go to the newly created GA4 property → Admin → Data Streams and click the Add stream button.
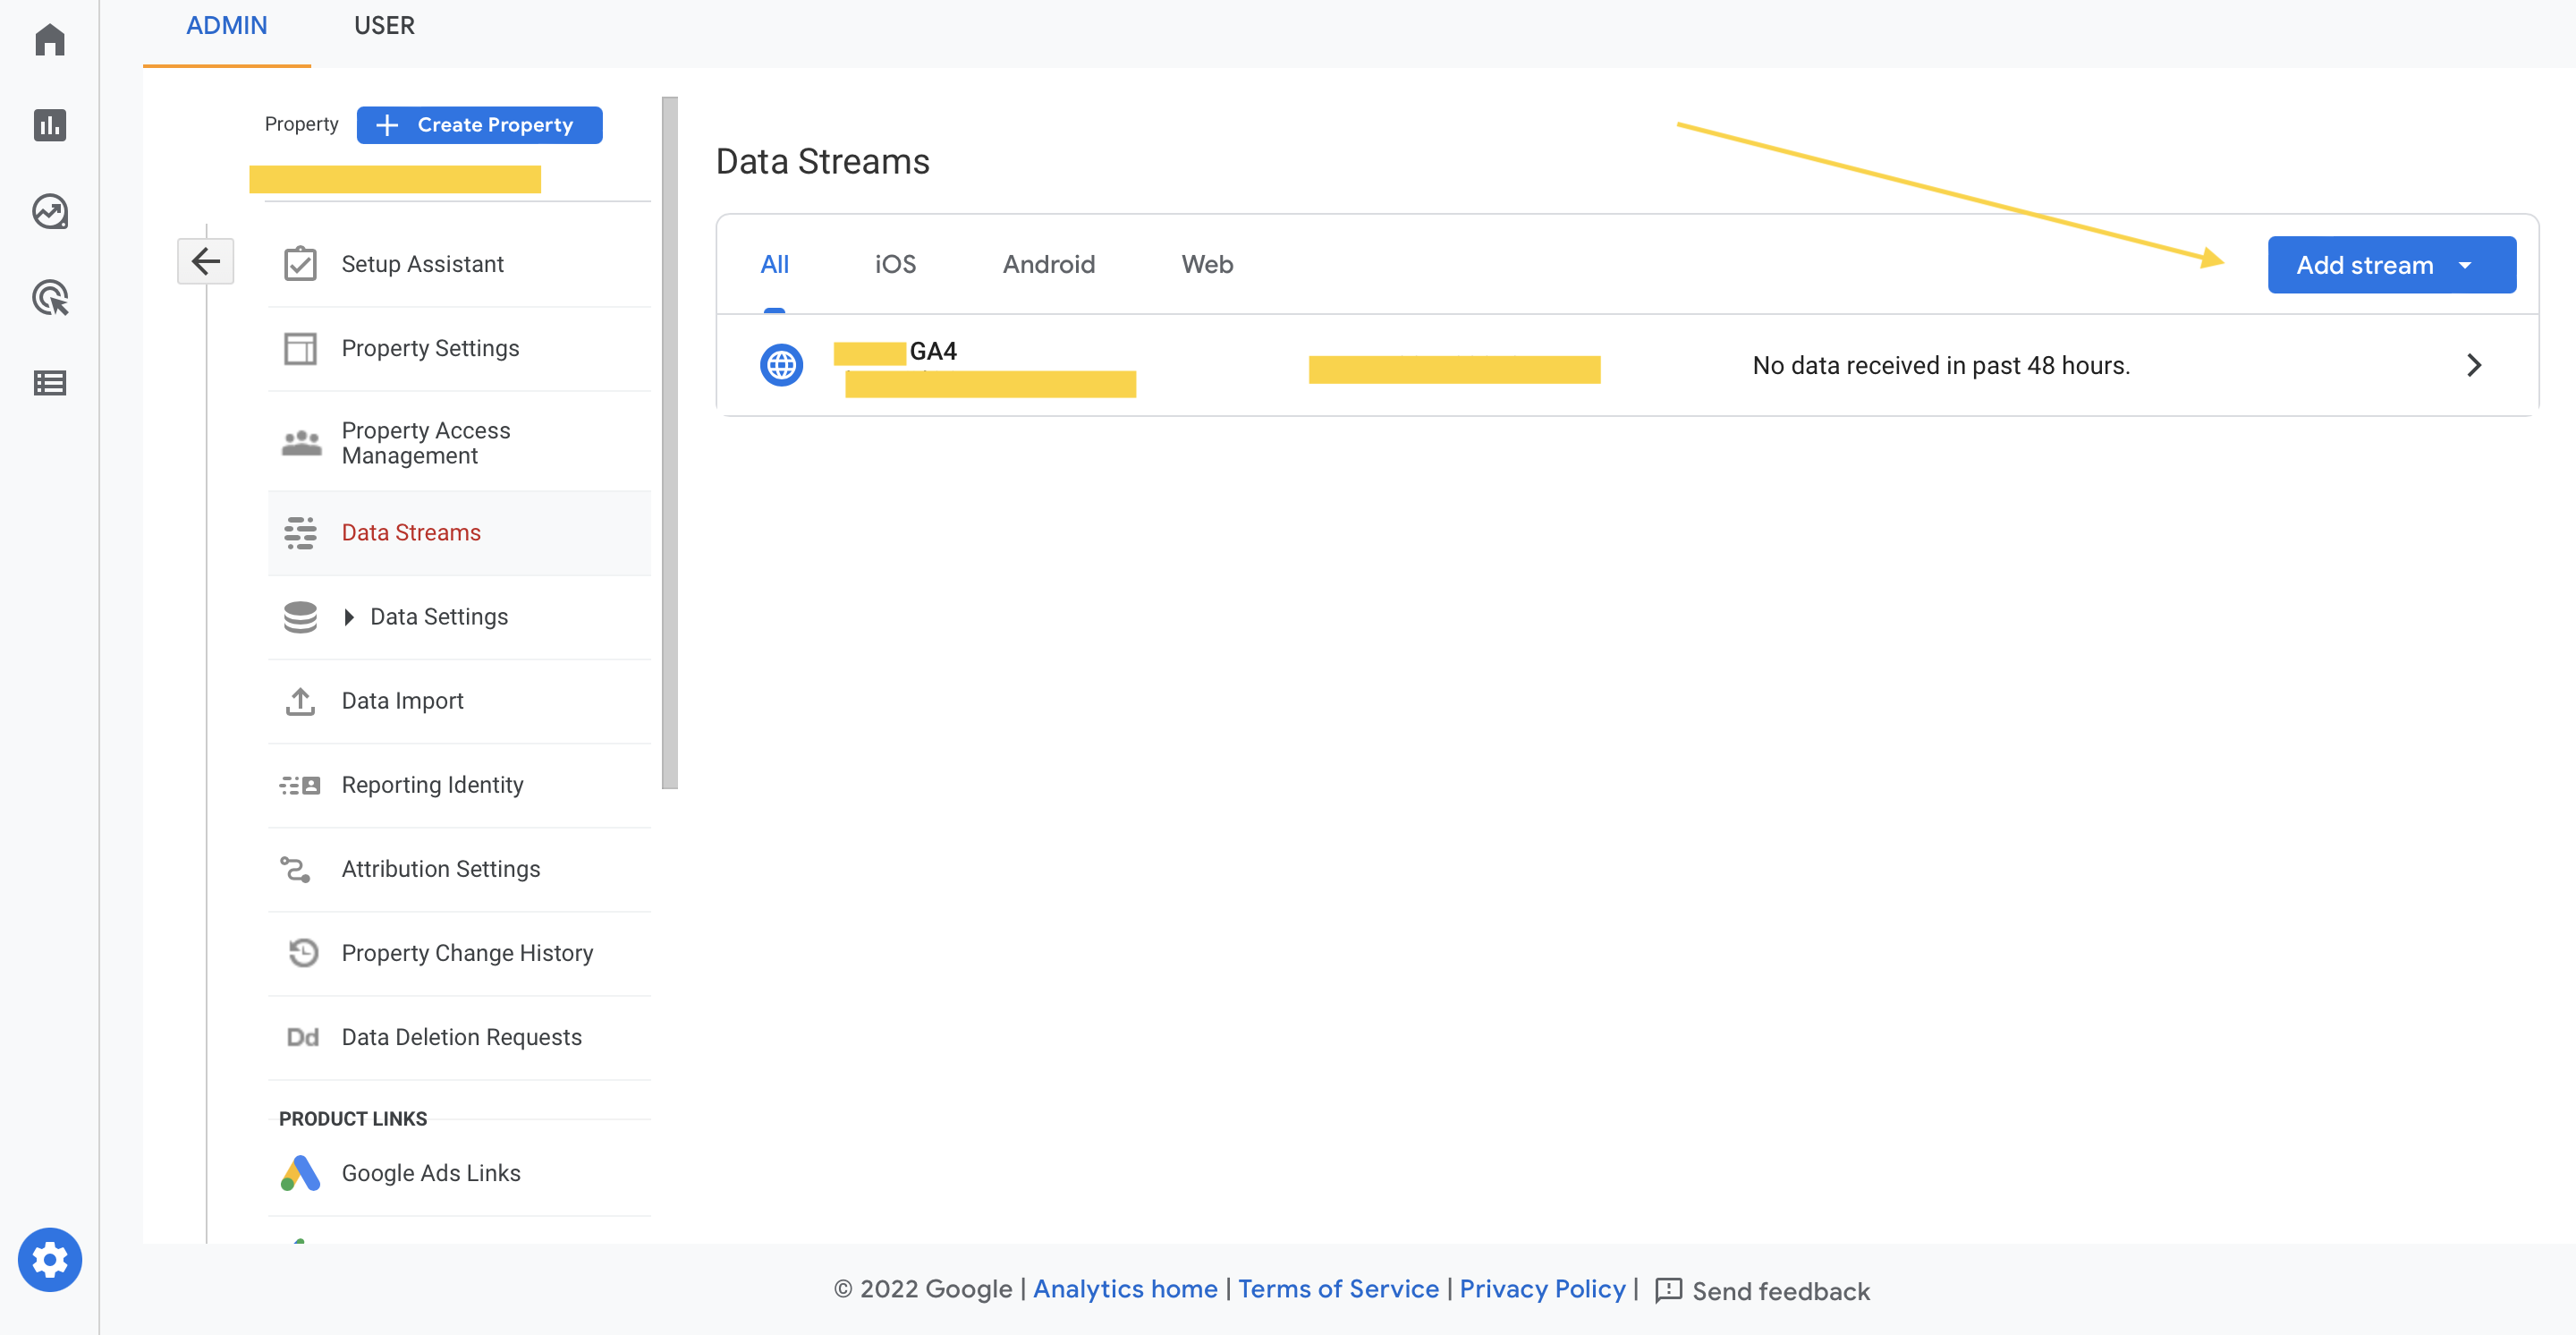
- Choose a type of the data stream. For the Shopify store, choose Web.
- Fill in the store (website) URL, name the stream and choose what you would like to measure on the site.
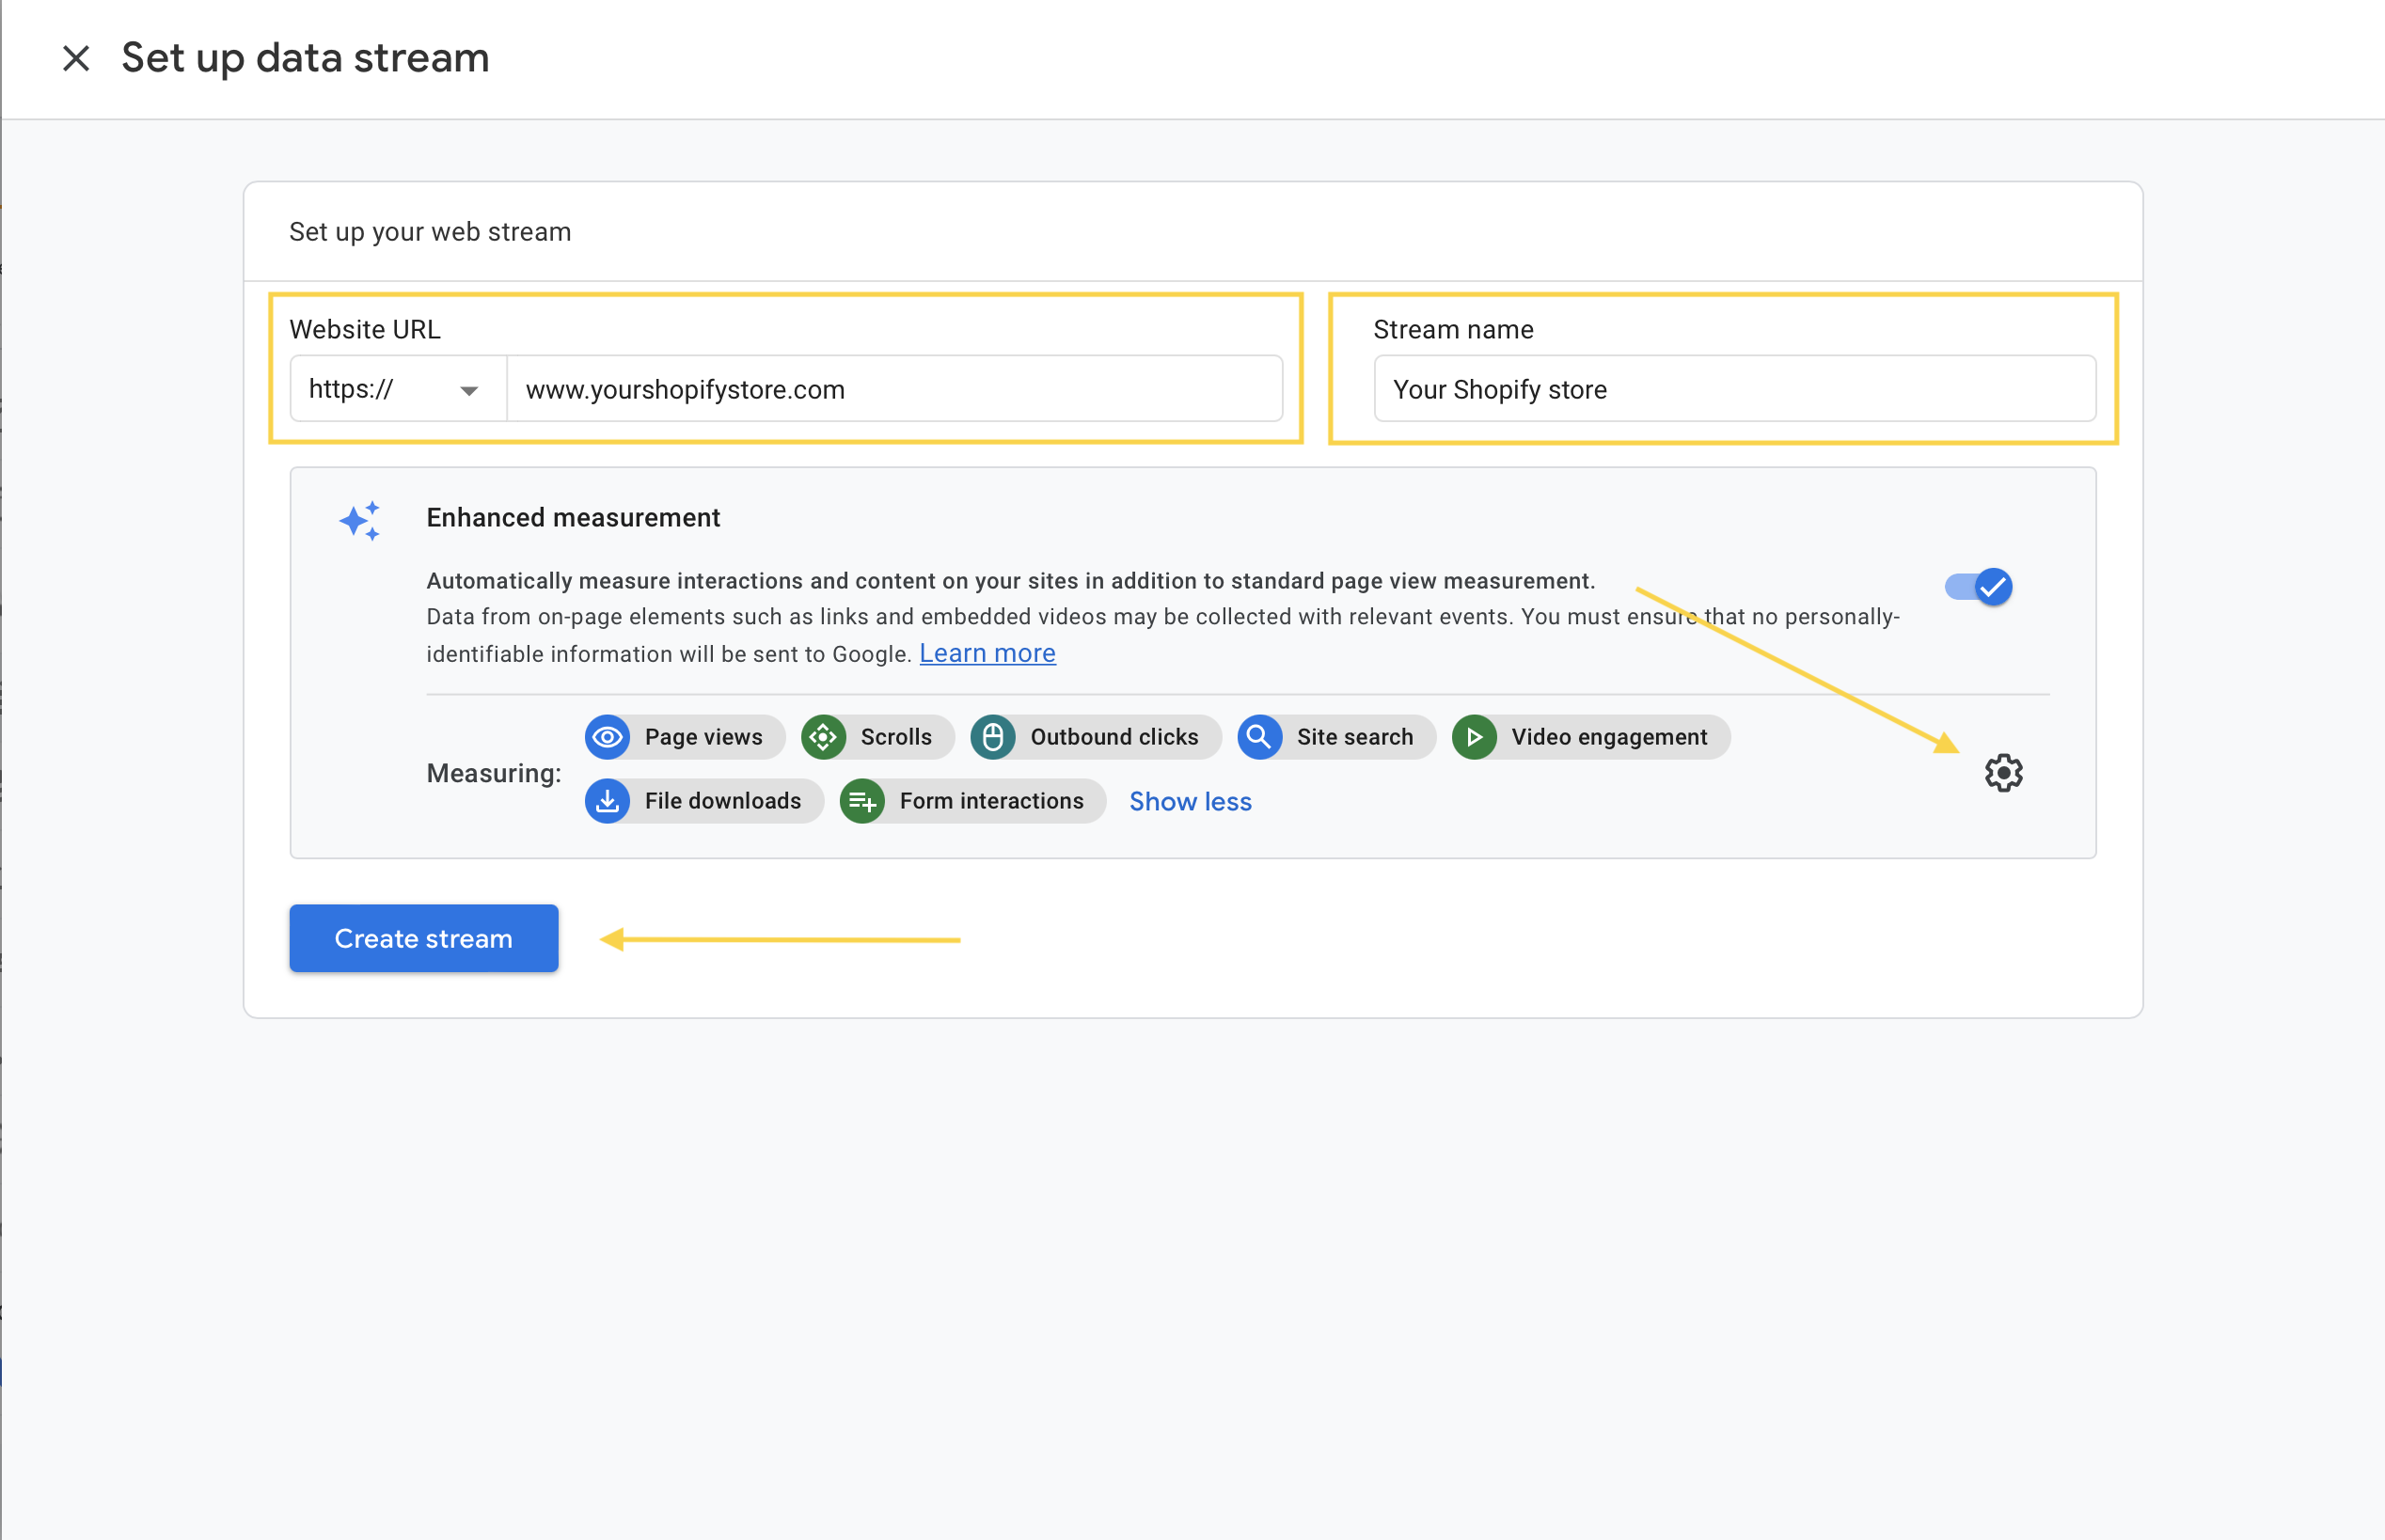
- You can configure enhanced measurement (e.g. you can decide that you don’t want to measure file downloads or site search. This is up to you).
- Create the stream.
- A familiar modal window with the Google tag install instruction will show up. Click the “Install manual” tab and keep the tab open.
Install GA4 to Shopify with the Shopify integration
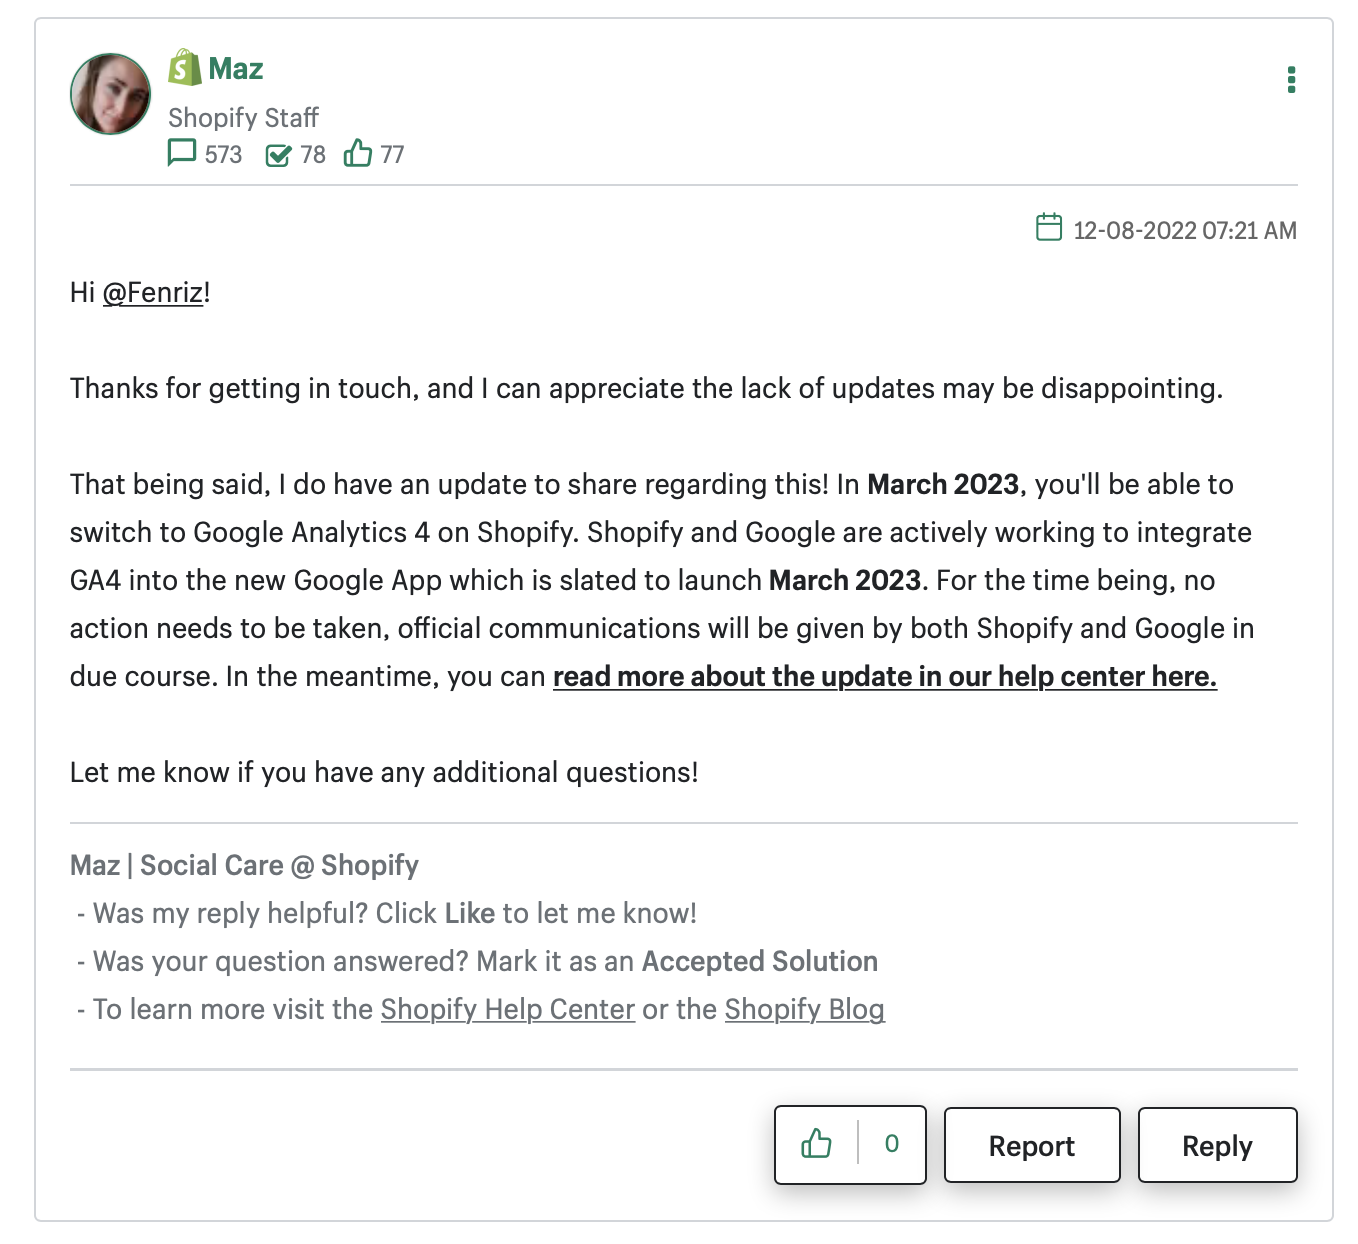
Unfortunately, the integration isn’t ready yet. There have been some unofficial announcements that the Google <-> Shopify integration should be ready in March 2023 (when a new Google App should be launched to the Shopify app store). If you don’t want to wait till then, read more in this guide on how to install the GA4 tag to your Shopify store manually or by using Google tag manager.
Update: March 2, 2023
Shopify has announced that Google Analytics 4 will be launching natively through the Google channel app on Shopify in March. To start using GA4 seamlessly, you will need to do the following steps:
- Create a new GA4 property together with the data streams in your Google Analytics dashboard.
- Install the Google channel app and log in to your Google account.
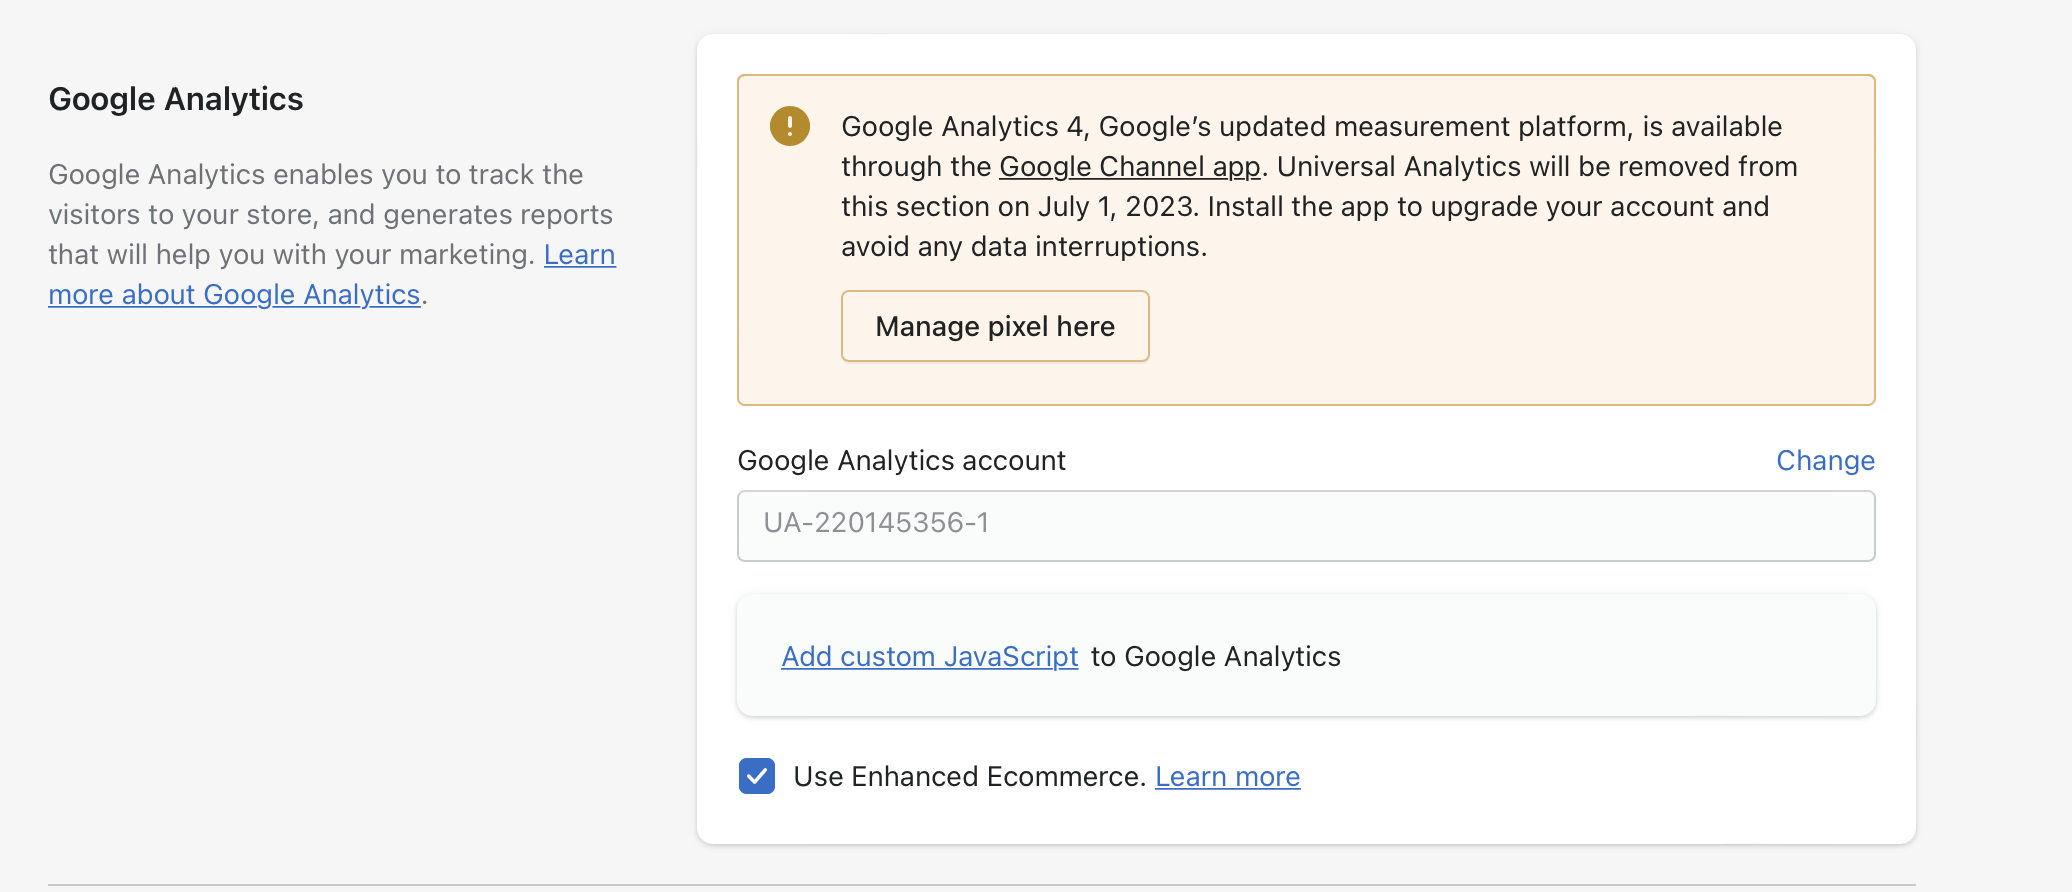
- Go to Online store -> Preferences -> Google Analytics section.
- You should see a notice to “Manage pixel here”. Click the button.
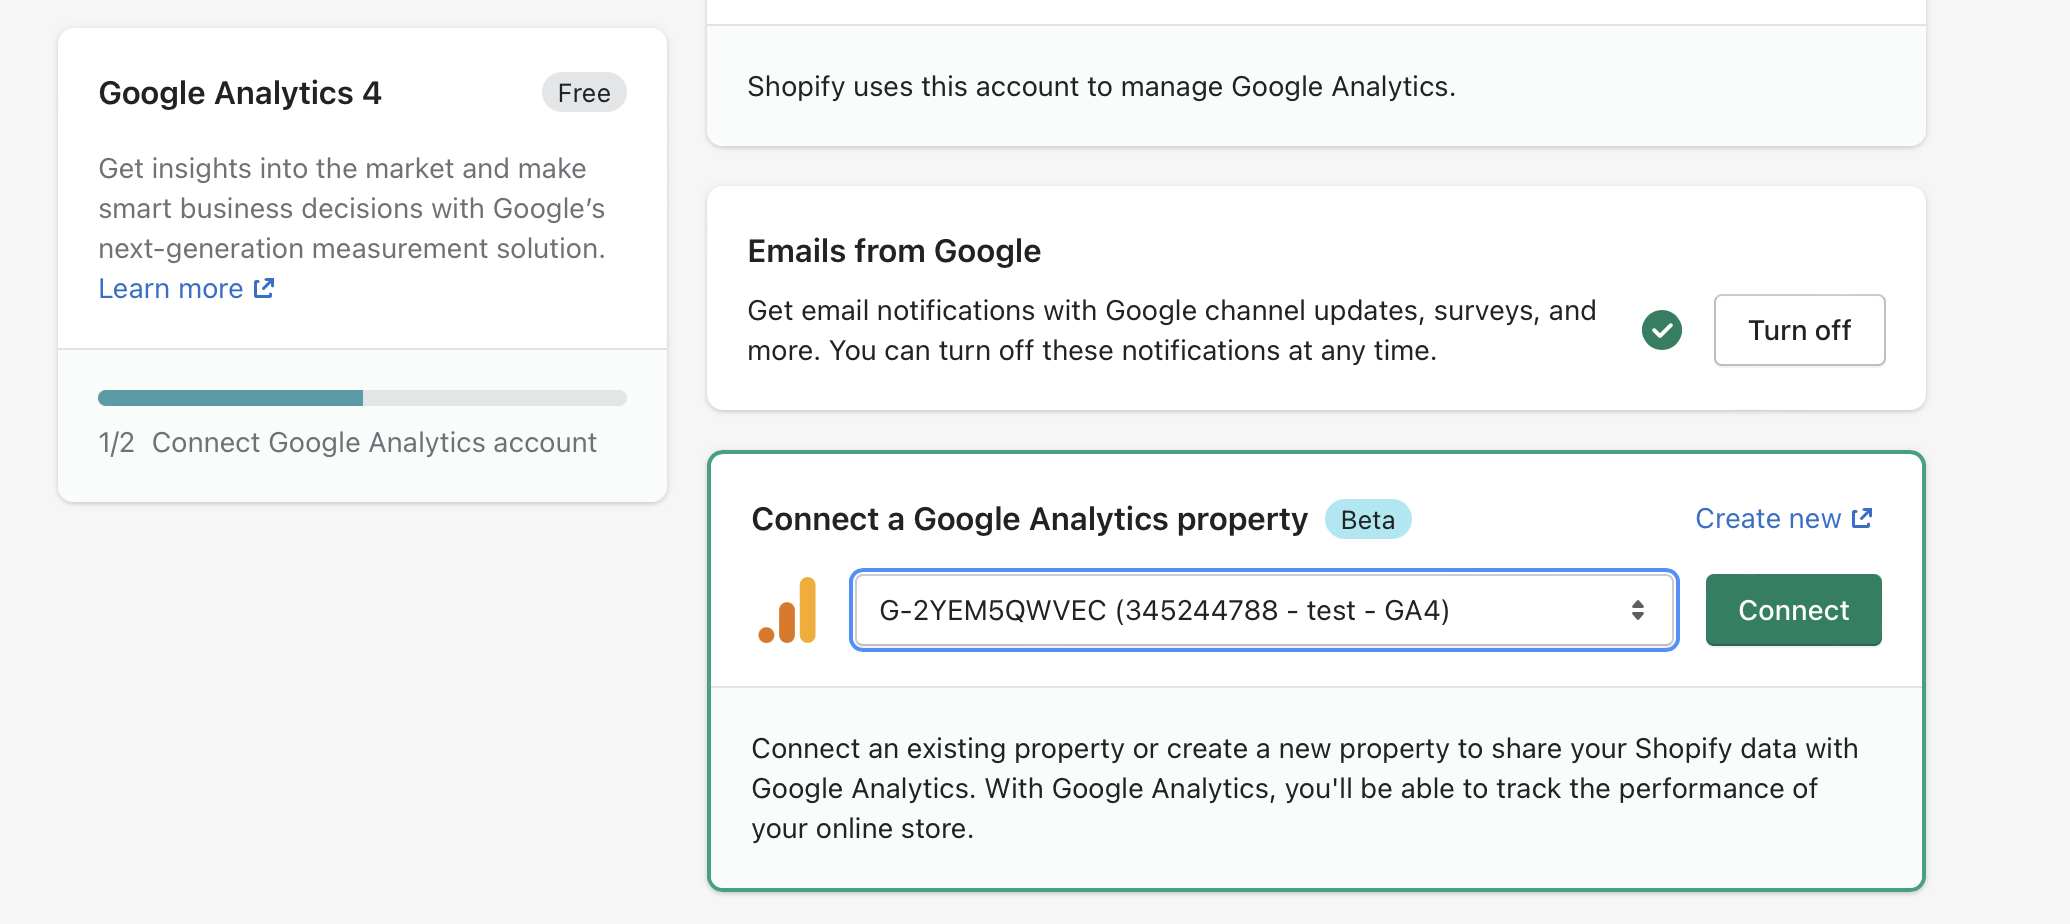
- In the “Connect a Google Analytics property” section, choose the GA4 property you would like to connect with your Shopify store.
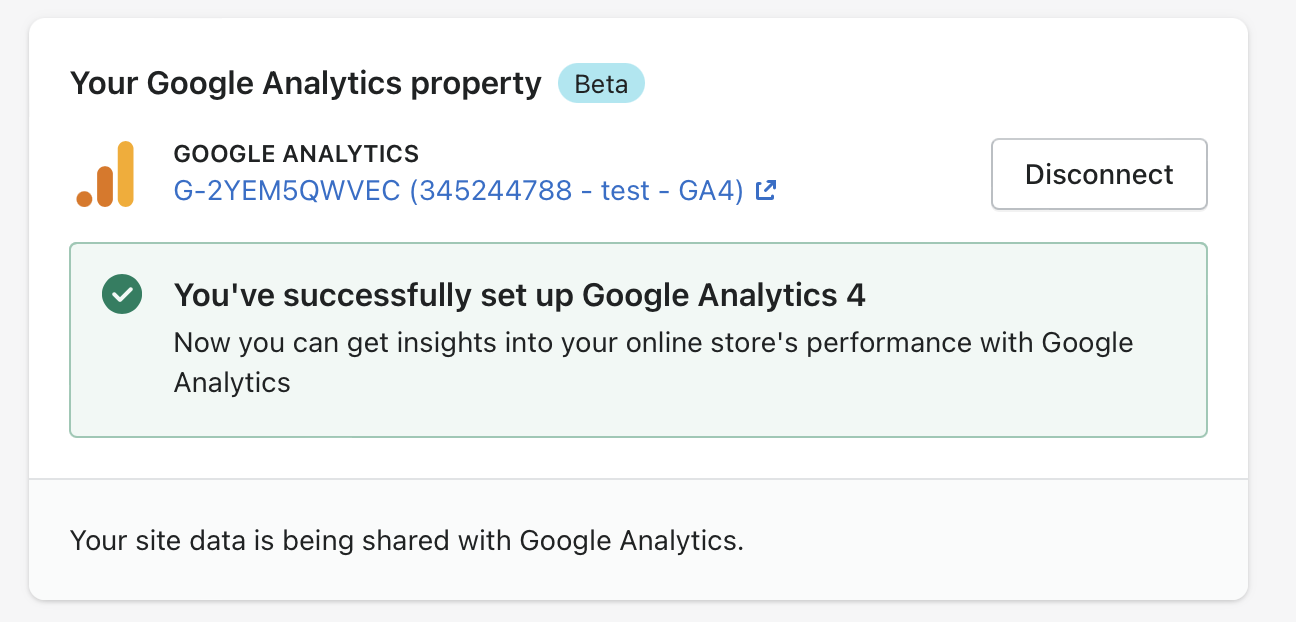
- After you connect the GA4 property, you should see a notice that the property has been successfully connected.
As you can see, the integration is in beta version right now. Therefore you might encounter some issues when trying to connect your GA4 property. Let’s see if there are any more actions merchants will need to do to fully take advantage of the integration.
Install GA4 manually with the Gtag to your Shopify store
- After you created a new GA4 property and added a web stream, it’s time to install the Google tag to your Shopify store.
- Go to Shopify admin → Online store → Themes → Choose your current theme and click the three dots.
- In the dropdown menu, choose edit code.
- Find the theme.liquid file.
- Add the following code snippet immediately after the <head> element. Don’t forget to replace “XXXXXXXX” with your GA4 measurement ID. (You can also copy the Google tag from the installation instructions in GA).
- Visit your Shopify store, make some clicks and go back to Google Analytics.
- Click Realtime overview and you should start seeing the data coming through.
Track Ecommerce Data
- Then, to track ecommerce data (such as purchase event), you need to add a code snippet in the “Additional scripts” section.
- Go to Settings → Checkout and accounts → Scroll down to Order status page.
- Insert the following piece of code in the Additional scripts window.
Install GA4 using Google tag manager (GTM)
- First of all, make sure that GTM is installed to your store. To learn more about how to install GTM to your site, please visit Google official documentation.
- In Google Tag Manager, click “New” to create a new tag.
- Name the tag “GA4”.
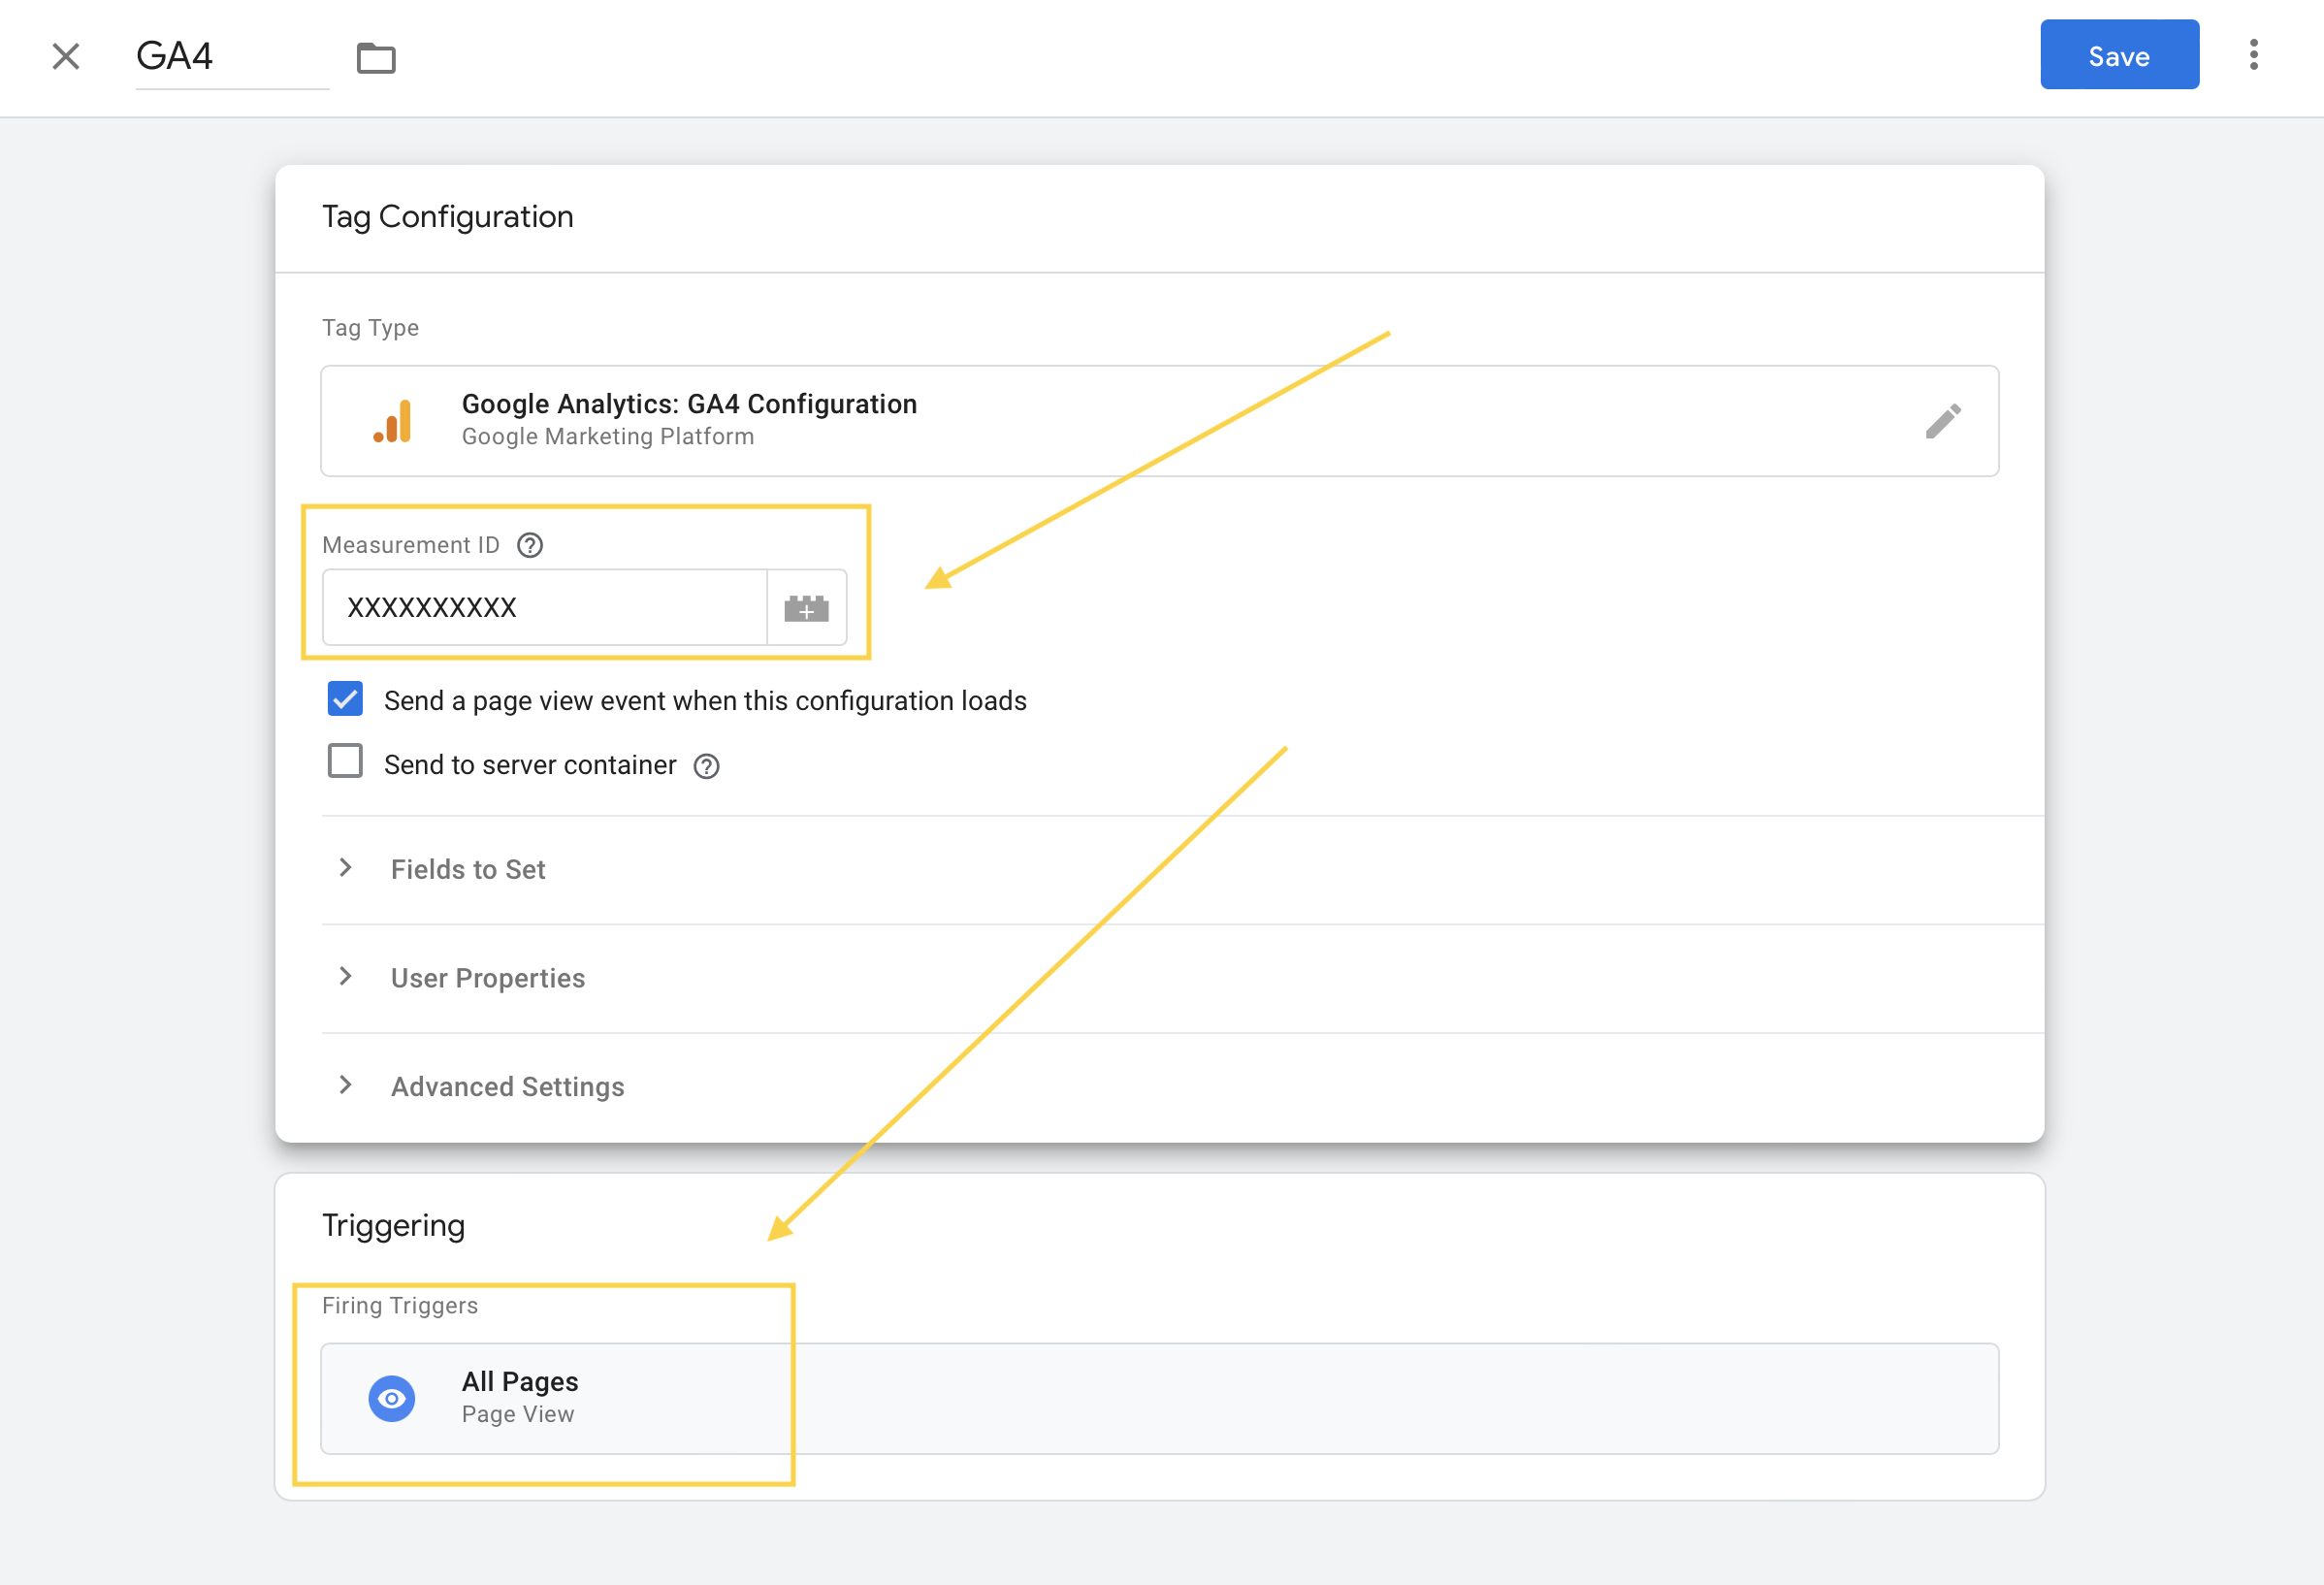
- In the “Tag Configuration” section, select “Google Analytics: GA4 Configuration”.
- Enter your measurement ID.
- In the “Triggering” section, select “All Pages”.
- Verify Google Tag Manager and your GA4 tag is installed correctly in Shopify by using Preview mode in Google Tag Manager.
- In Google Tag Manager, click “Submit” to publish your tag.
- Visit your Shopify store, click some pages and go back to Google Analytics.
- Click Realtime overview to start seeing the data coming through.
Add GTM with data layer to the additional script
- Go to Settings → Checkout and accounts → Scroll down to Order status page.
- Insert the following piece of code in the Additional scripts window.
Note: This is a basic set up of the data layer. You might need to add some more specifications and edit the code so that the tracking meets your business & marketing goals. Learn more about the data layer from official Google documentation.
Create variables
- To pass the details of each purchase to Google Analytic, you will need to create a couple of data layer variables, an event tag (for purchase) as well as a trigger, which fires the event.
- To make it easier for you, we’ve pre-defined a container, which you can download and import directly to GTM (including the all pages tag for GA4).
- Download the container here.
- Please bear in mind that we created a very simple setup, which might need some more customizations (such as adding more variables, editing the variable definitions, and else) so that the settings suit your business needs.
- Import the container to your workspace in GTM. Make any changes to the variables, tags or a trigger. Don’t forget to change “Insert Your Measurement ID here” in the GA4 tag configuration Measurement ID field to your GA4 measurement ID.
- Preview and submit the changes.
Excluding Shopify checkout page as referral
To make sure that purchases are attributed to the correct marketing channel, you will need to prevent the Shopify checkout pages from showing up as referrals in your reports. To do this, follow the steps below.
- Open the web data stream in GA4.
- Click “Configure Tag Settings”.
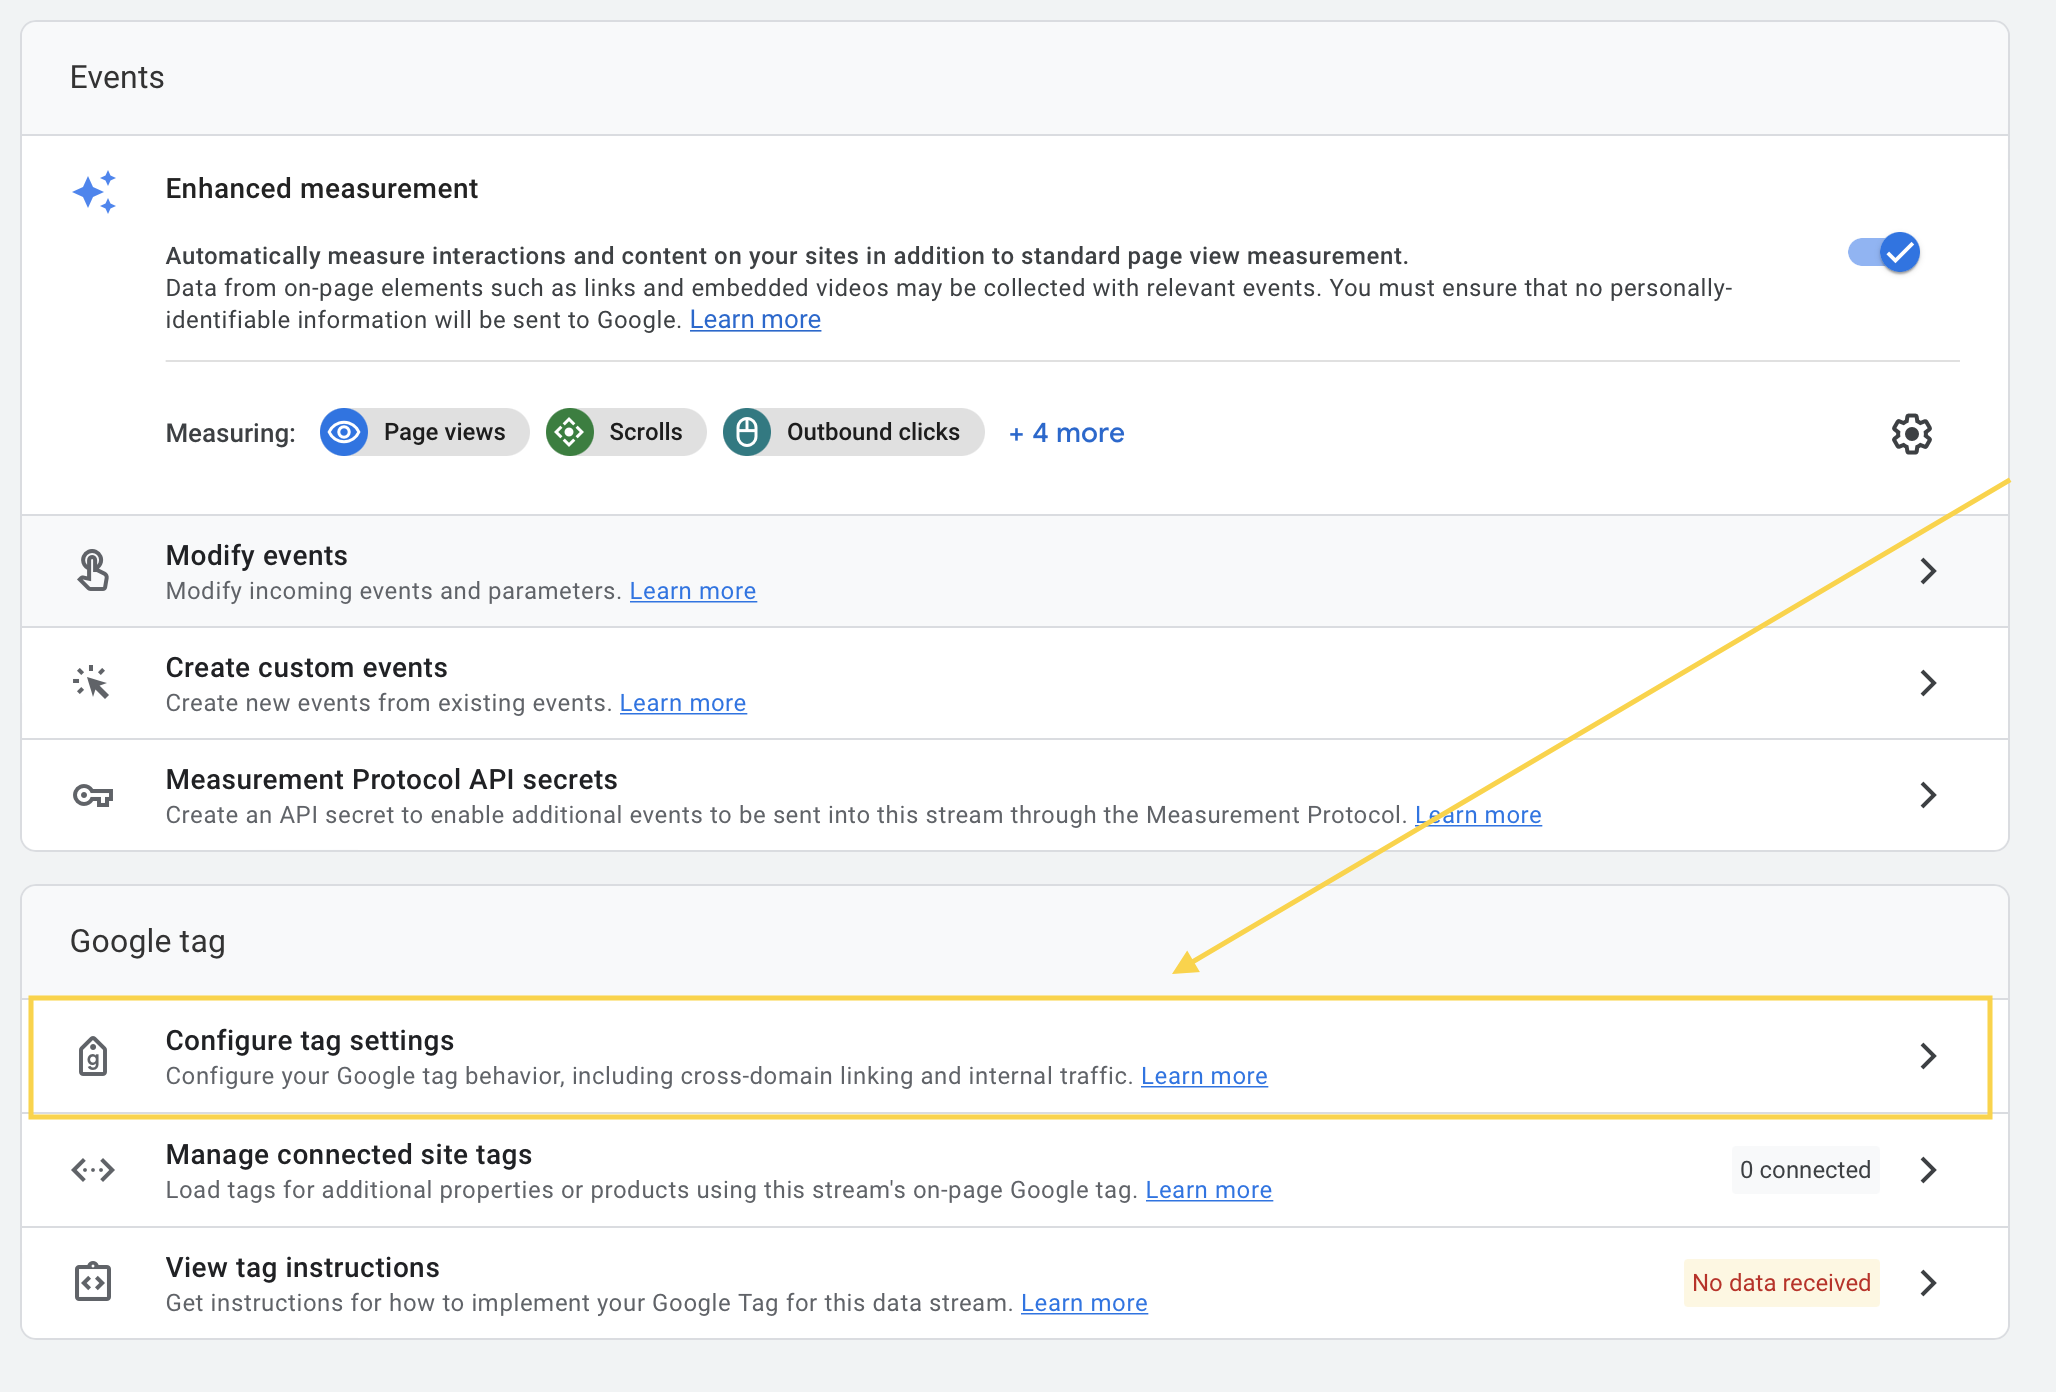
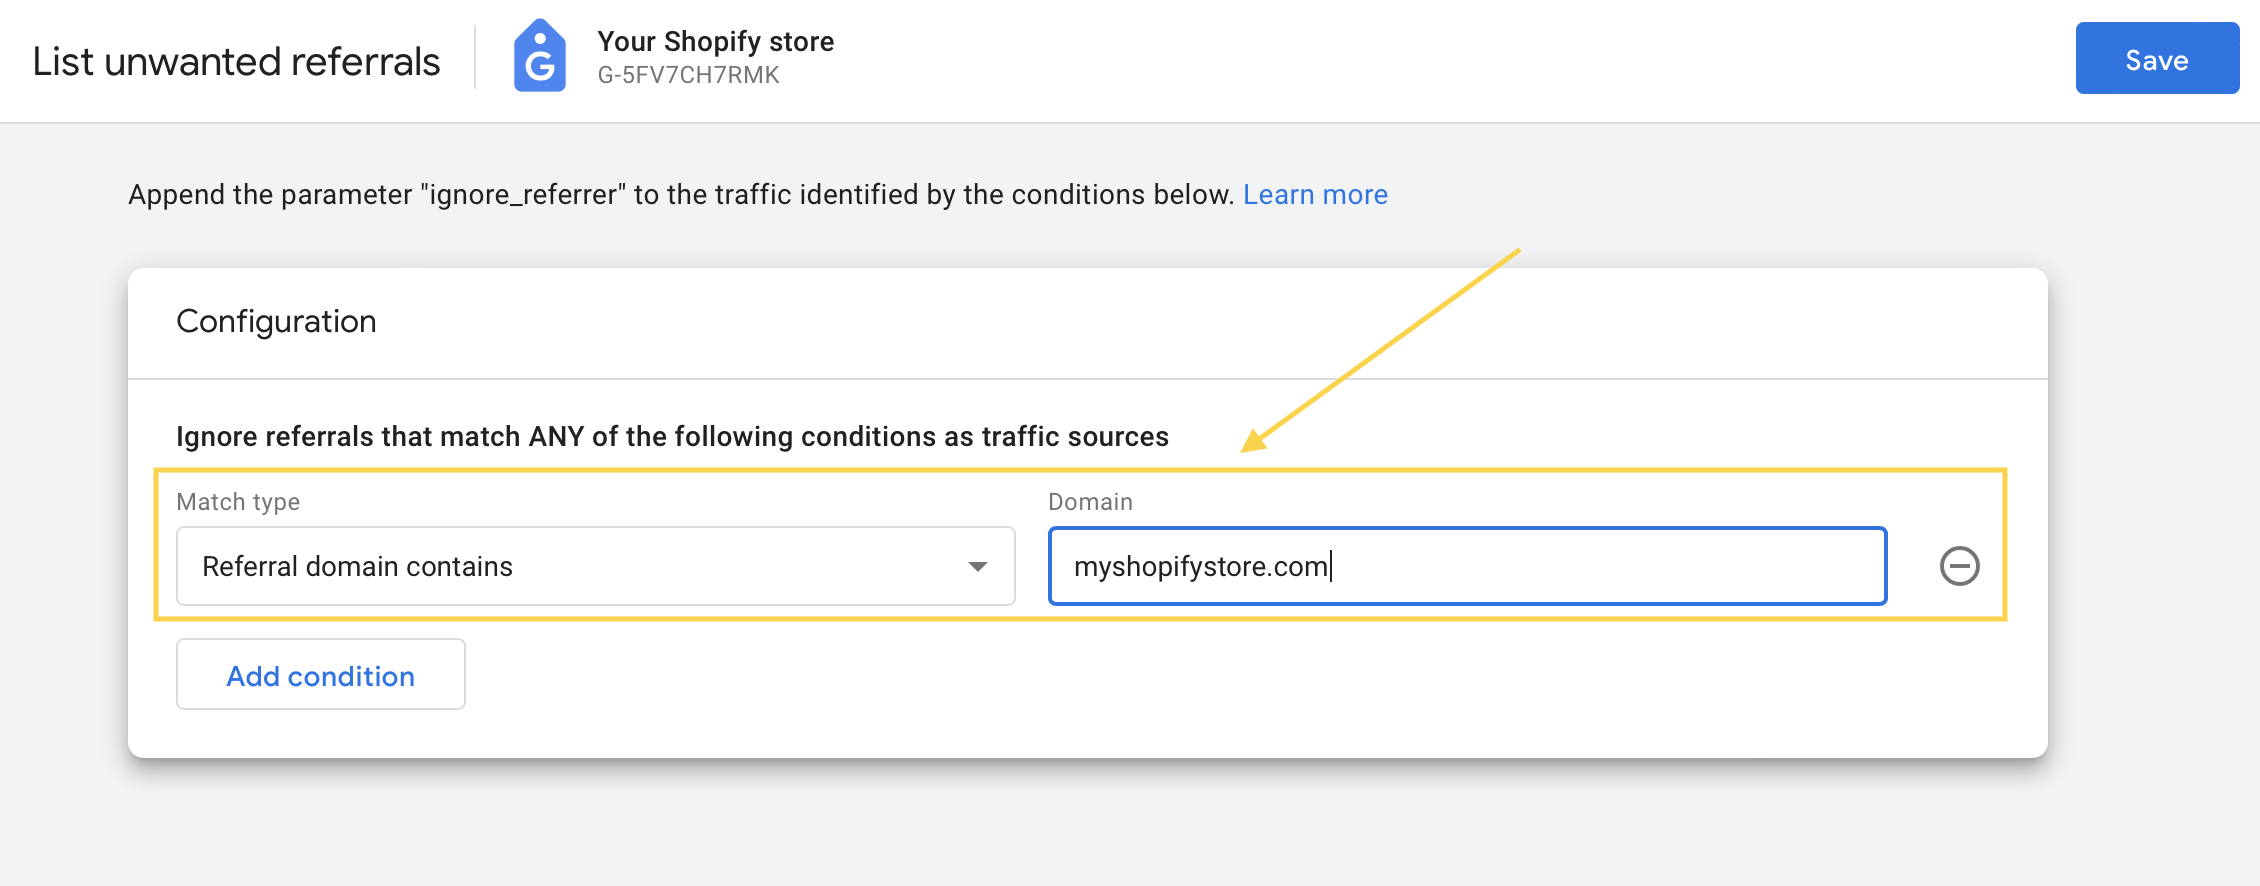
- In the Settings section, click the dropdown menu Show all and click List Unwanted Referrals.
- Enter the domain of your Shopify store.
Important note: We described the simpliest solution on how to install GA4 to your Shopify store. You will probably need to make some more customizations, modify the code, add more variables or so, when you’ll be setting up the configuration. Plus, Shopify has unofficially announced that the integration Shopify <-> GA4 should be ready in March 2023. When it’s done, it might happen that some steps will need to be done differently. We’ll update you about that.
Last but not least, we would like to stress out that we don’t support Google analytics. We prefer 100% privacy-friendly analytics platforms such as Plausible Analytics or Simple Analytics. However, since most of our clients use Google Analytics and came to us to discuss the migration to GA4, we decided to write a guide on how to do it.